Home Blog Page 25

Camping Dessert Recipes: Most Mouth Watering Outdoor Recipes

0
Strawberry Fruit on Brown Wooden Board

Whenever stuffing the backpacks with usual household meals, preparing for the outdoor adventures, most people tend to forget or overlook the need to have the camping dessert recipes. Some view the effort as time consuming or rather infinitesimal. Having sweet, appetizing and mouthwatering desserts gives you an inspiration to plan yet another outing because, to be honest, it’s what keeps others glued to the desire to camp frequently.

Kids’ desires and enthusiasm to never be left behind when heading to camping is influenced by the delicious desserts served at camp sites. The hesitation to indulge in camping desserts can be attributed to minimal knowledge of a wide range of recipes out there. Some hate the fact that they have to spend more time preparing the desserts instead of hiking or backpacking. This shouldn’t be a problem at all.

Banana Cupcakes with Rum Caramel Frosting and Rum Caramel Sauce

In this article, plenty of dessert recipes are given on the basis of their ease of cooking and preparation. You will now have a reason to come back or to, lure your kids to join you. But, the bigger part having these dessert recipes, is the preparation from home. Some desserts need to be well-prepared ahead of time so that your cooking time at the campsite is reduced. We will give you tips below.

Preparation for camping desserts

Preparation depends on the complexity of the dessert you spot your eyes on. Others may be fine to prepare after pitching your tent, whereas some need to be mixed before you leave. Make a checklist of the steps below:

  • Prepare all your mixtures ahead of time at home and then wrap them in an aluminum foil and freeze them. It will be much better to cook them on a campfire in the wilderness rather than having to prepare from scratch the time-consuming mixtures.
  • While preparing your mixtures, make sure you mix according to the recommended instructions on the packages.
  • Then when heading to your camping destination, make sure you have every kitchen gadget you’d need. For example, it may be freaking to cook anything wrapped without spraying the sheet first, because the desserts are more likely to stick to the sheet. Bring the cooking spray and other toppings you might need.
  • And when cooking, some desserts may negate the need to use pots or pans, and some may need only the campfire. We recommend having coal for your fire if a grill is heavy to travel with. When cooking some dessert recipes that need the roasting stick, do not leave the stick on the flame for a long time, but rather hover it until a desired golden color appears.

These steps should be enough to prepare for your camping desserts. What’s left is to skim through our handpicked desserts below to check the best for your cooking skills.

This skillet cookie recipe is a great dessert to make while camping.

It might be challenging for an inexperienced cooker, but the instructions we will emphasize are quite in lame man’s terms. Let’s get into the dessert selections.

Camping Desserts for Outdoor Adventures

Campfire Roasted Caramel Peaches with Pecans

Roasting peaches on a campfire or, even better, a grill is an absolute breeze and quick thing. You can serve your companions in a matter of minutes. All you need to ace this seasonal dessert are the following ingredients:

  • 2 ripe peaches
  • A teaspoon of butter
  • 2 spoons of caramel sauce
  • ¼ cup pecan halves

After having these ingredients, you can follow the following instructions to have this appetizing seasonal dessert:

  • If you brought the grill to camping, preheat it
  • If not, then prepare your campfire using coals or any reliable woods
  • Then smear butter on a 6-inch square of the aluminum foil and sprinkle the tablespoon of brown sugar or, even better, the caramel
  • Spread the pecans on the caramel
  • Then slice the peaches into halves and remove the seed from all the 4 halves
  • Then cut down the halves to the pecans and then sprinkle the caramel sauce once more.
  • Subsequently wrap the peaches with the foil and then put the dessert on the campfire wrapped or in the grill. It should take a maximum of 25 minutes for the dessert to be fully cooked.
  • Then remove the dessert from the heat and open the foil to get rid of the steam
  • Serve it while still warm. So put it on a plate for it to cool and for the juices to be drained.

Campfire Roasted Caramel Peaches with Pecans

NB: do not use the caramel sauce and the brown sugar at the same time. Because it’s scarce to have the sauce, you can replace it with the brown sugar.

Peach Mallows

Peach mallows are sweet and juicy. The pleasure of them melting in your mouth is beyond imagination. This will surely put a spark of a smile to your companions, and it takes only 10 minutes to cook it. Preparation time is approximately 5 minutes. Normally can serve one, but you can increase the quantities to serve more. The ingredients are as follows:

  • A peach
  • Additional toppings such as the choc chips, peanuts, strawberries, etc.
  • Spoon of butter
  • Teaspoon of cinnamon
  • 1/8 cup of mini marshmallows

The directions are as follows. But before, from your home, make sure that the ingredients are separated well in containers or packets. Beware of the peaches because they can be bruised or squished with ease. When cooking, follow the instructions hereunder:

  • Cut the peach into halves
  • Fill it with marshmallows and butter and then sprinkle cinnamon on both halves
  • Then wrap the peach halves with the aluminum foil
  • Put on the campfire for about 5 minutes
  • Then serve it

Campfire S'mores with Homemade Marshmallows

Cinnamon Roasted Pears

Cinnamon roasted pears are also the quick and delicious camping recipes that will make your weekend camping splendid. To excel in this seasonal dessert, follow the instructions below:

  • You must purchase two pears and slice them into halves, then remove the core.
  • Smear butter on each of the halves and sprinkle the cinnamon sugar on them
  • An optional topping may be added as well. These could be the chopped nuts, choc chips, granola or the toasted sunflower seeds.
  • The divide the two halves of pear and wrap each with the aluminum foil.
  • Cook them separately on the campfire for about 25 minutes each.
  • Serve while warm

Cinnamon Roasted Pears

Berry, Chocolate and Cake Skillet

The combination of chocolate, cake skillet and the berry is a delicious dessert to let you admire your camping days. Everyone can excel with this dessert recipe. The ingredients are as follows:

  • 4 cups of fresh berries
  • 2 teaspoons of sugar
  • ¼ cup of butter
  • 2 candy bars or caramel milk
  • 4 cups cubed vanilla pound

Now follow the instructions below for preparation:

  • Prepare a bowl and then put fruit and sugar in it. Leave them for 10 minutes to macerate
  • Make the campfire or preheat the grill
  • Place the skillet on the grill and fry the cake cubes in the butter
  • Remove the skillet from the grill, then sprinkle with choc pieces and fruits
  • Cover the content with the foil until the choc pieces melt

 Berry, Chocolate and Cake Skillet

Chocolate Fondue

It takes 5 minutes to prepare the Chocolate Fondue and 20 minutes to cook. It can serve 6 people on a camping trip. The ingredients are as follows:

  • 2/3 cup of cream
  • 2 spoons of pure vanilla extract
  • 12 ounces of chocolate
  • 1 to 2 cups of food to dip (could be fruit or marshmallows)

The instructions to cook this camping dessert are as follows:

  • Firstly, you must store the cream in an insulated container from your home ahead of time. Other ingredients can be stored in separate containers
  • While at the campsite, break the 12 ounces chocolate and put it in a bowl
  • Boil water and pour it in the bowl to simmer the chocolate, then leave them for about 10 minutes
  • Then remove the water from the top
  • Pour vanilla and cream and stir the mixture
  • Then dip the resulting mixture

Chocolate Fondue

Chocolate Banana Oat

This combination may seem weird, but it’s one of the classic and dazzling camping treats that are easy to make within 15 minutes.

The instructions to make this appealing camping dessert are as follows:

  • Peel the bananas only a small strip about ¾ an inch
  • Then use the spoon to remove some contents to create a small trench where you can fill the choc chips.
  • Wrap the banana with the aluminum foil and then cook for about 15 minutes
  • After cooking, allow the banana to cool because it will be very hot

Chocolate Banana Oat

Honey-Rum Grilled Bananas

It seems you can make a wide range of desserts with bananas. Honey-Rum grilled bananas are just some of the most delicious and mouthwatering camping desserts. To make this dessert, you need the following ingredients:

  • 2 tablespoons of rum
  • 1 teaspoon of cinnamon
  • Vanilla ice cream
  • 2 spoons of honey
  • 4 unpeeled bananas

The honey-rum grilled banana is one of the most nutritional desserts. It contains 158 calories, 1g fat, 2mg sodium, 1g protein and 37g carbohydrate (30g sugars, 3g fiber). And to cook this dessert, follow the instructions below:

  • Prepare the small bowl and mix rum, cinnamon and the honey.
  • Then slice the banana lengthwise and do not remove the peel
  • Put the bananas cut side down on the grill then cook for 3 minutes. Brush it with the mixture prepared in the bowl.
  • Cover and grill them for about 5 minutes until done.
  • Then serve them to 4 people

Honey-Rum Grilled Bananas

Campfire Pies

You do not need complicated utensils to have the delicious pies while camping. Campfire pies require only minimal ingredients to prepare them. That is why these pies are ideal for both the experienced and inexperienced cookers. You need the following ingredients:

  • Cinnamon sugar mixture
  • Bread slices
  • Seasonal fruit (apple slices, peach slices, pear slices, raspberries or strawberries)
  • Canned pie filling

To prepare for this season dessert, we have compiled the following instructions to make it easy for you:

  • Preheat your grill or make a very hot campfire preferably with coals
  • Get the sandwich iron ready and spray its insides with the cooking spray so that the dessert does not stick
  • Then put the slice of bread on each side of the sandwich iron and press it against the iron
  • Put fruits on the bread
  • Sprinkle cinnamon sugar mixture (a teaspoon on the bread as well)
  • Then cover the bread using the two sides of the sandwich to make an indentation in the bread
  • Remove any bread pieces that might be left hanging on the sandwich iron
  • Then put the iron on the campfire to cook. It should take about 3 minutes until a golden brown color appears on the sides
  • Allow the pie to cool down before you serve

You can actually make many variations of these pies using a variety of recipes. For example, you can add Nutella, peanut butter, choc chips and sliced bananas to make a sweeter campfire. Or you can make use of pizza fillings such as ham & cheese to make savory pies. There are plenty of options to enjoy your appetizing campfire pies.

Stainless Steel Fork on Top of Brown Cooked Pastry on Top of Red Ceramic Mug

NB: The sandwich iron needs to be seasoned before you use it. If you are traveling with companions, we reckon you buy extra seasoned sandwich irons. The equipment you need, includes the knife, grill/campfire and a cooking spray.

S’MORES Pancakes

The taste of S’MORES pancakes will surely make your mornings priceless and splendid. They are made tastier by the graham cracker crumbs. Infusing them with the chocolate chips boosts the delicious taste. Even further, the marshmallow fluff syrup can be drizzled over the top of the pancake to make a complete camping dessert treat and can serve 4 people. The detailed ingredients are as follows:

Ingredients:

  • 1 cup of flour
  • ½ cup of crushed Graham crackers
  • 1 teaspoon of salt
  • 1-1/4 cups of milk
  • 1 spoon of baking powder
  • 1 egg
  • ½ cup of choc chips

And to prepare this treat, you can follow the instructions below:

  • Prepare a large bowl and add flour, Graham cracker crumbs, salt and the baking powder.
  • Pour in the milk
  • Then beat the egg as well to add it to the bowl mixture
  • Also pour the choc chips and mix everything
  • Then pour ½ cup of batter in a pan and then cook until each side of the pancake turns brown in color

To make the marshmallow fluff syrup, you need 2 spoons of warm water and the 1 cup of marshmallow fluff. And to prepare it, you need another bowl in which you must mix the marshmallow fluff and warm water until the mixture is smooth. You can warm that mixture on your campfire or in a microwave at home before leaving.

S'mores Pancakes

Then you can sprinkle the marshmallow fluff syrup over the pancakes and serve.

Chocolate Cherry Ricotta Grilled Pizzas

Pizzas are favorite treats for many outdoor hobbyists, especially kids. Treating kids with these pizzas will be giving them hundreds of reasons to come back every time to camping. These chocolate cherry ricotta grilled pizza take only 3 minutes to prepare it and 10 minutes to finish cooking.

You can serve 8 people with these 8 mini grilled pizzas.

Ingredients:

  • Cooking spray/sunflower oil
  • Whole wheat or pizza dough
  • Fat free ricotta cheese
  • Chopped chocolate
  • Chopped nuts, pecans, walnuts or almonds
  • 1 cup of cherries
  • Vanilla or almond extract drops (optional)
  • Vanilla or toffee Stevia drops
  • Toppings can be fresh mint melted chocolate, cinnamon, or powdered sugar

To excel with this camping dessert, you can follow the instructions given below:

  • Make the campfire until it is very heat or preheat the grill to high heat. But first spray the grill with the cooking spray first.
  • Then prepare a bowl to mix the ricotta cheese with the extra/sweetener of your choice.
  • Prepare another bowl and mix the berries, nuts and chocolate chips in it.
  • Cut the pizza dough into 8 pieces and flatten it. Use brush to smear oil on each side of the pizza
  • Then grill the pizza for 2 minutes. Do not cover the grill.
  • Reduce the heat from high to medium and keep tossing the pizza. Then remove it from the grill.
  • Add some ricotta cheese, nuts and chocolate chips then take the pizza back to the grill. This time cover the grill and wait for about 4 minutes until choc chips have melted
  • You can then serve the pizza with optional toppings

Tips: Instead of cutting the dough into 8 pieces before cooking, you can cook one large pizza and then slice it after cooking. And instead of buying the pizza dough, you can make yours using the whole wheat.

Chocolate Cherry Ricotta Grilled Pizzas

To sweeten the ricotta cheese, you can top it with honey or maple syrup.

Wrapping it up

These are our top selections of camping desserts that will surely inspire you or your companion to repeat camping in a year. After reading them, you will realize that they are all easy to make, and do not need dozens of gadgets in the wilderness to prepare them. Like we reiterated, you must prepare all of these recipes at home in order to reduce the number of utensils that might be needed in the wilderness. Aluminum foil is a solution to wrap your mixtures ahead of time.

Sweet apple pie

Edible Bugs: Why You Should Eat Them and Where to Find Them!

0
Close-up photo of a Cricket Outside

The ability to survive in any situation boils down to the most basic and important tenet of life, food. This is as true for extreme survival situations as it is for traveling. Having an open mind when it comes to food will allow you a richer life experience, and, in extreme situations, give you the ability to make it home alive. If you are a picky eater, this needs to change, immediately. Any trip you may be planning will become a nightmare if you are not ready to add edible bugs to your menu. This is because many countries around the world not only eat bugs, but use them as a main food staple.

Insects are nutritious, easy to find, easy to grow, and are the number one protein source for billions of people. It is important to remember that countries like Thailand and Cambodia, where insects are regularly sold, do not have the same protein availability found in Western countries. There is not enough land, water, and feed to grow enough cows and chickens to satiate everyone.  If you are thinking that the oceans can fill the food security gaps left by domesticated animals, forget about it.

Worms ready to be eaten

Overfishing has decimated marine life and many of the same countries that cannot grow enough animals for food have already outfished their oceans. In many regions of the globe, insects are all that is left. Please, remember this reality as you struggle to accept the necessity of eating bugs

Bugs You Can Eat

Crickets

Probably the most common insect found in food markets. They are easy to cook and highly nutritious, being a good source of protein and vitamins. Crickets can be found in all South East Asia countries, usually sold by street vendors, precooked and seasoned. Cricket flour, enjoys a small niche market in the United States and Western Europe, and if you are interested, can be ordered online. There is a famous cookie recipe, Chocolate Chirp Cookies, using cricket flour to add that special flavor.

cricket food on a plate

The cricket’s popularity lies in their ability to be grown indoors on the cheap. The very same crickets sold in pet stores to feed herpetologists’ obsessions can be used for human consumption.

Cricket tips!

When eating, be careful of the legs and chew thoroughly to avoid having them lodge in your throat.

Where to harvest Crickets

Crickets reach maturity by mid summer and can be found in tall grasses and fields. Areas where grass grows such as pasture, manicured lawns, and even berry patches, offer ample cricket habitat. Crickets are very loud and their distinctive chirping can be easily identified around dusk. Follow their calls to find large concentrations in order to have the best luck. It is best to always cook the insects as this will make them easier to digest and allow your body to process the nutrients better.

Cricket on a plant during daytime

In some regions crickets are seen as pests and many people pay money to have them eradicated. Some entrepreneurs have taken advantage of this and actually get paid to collect them!

Scorpions

 While not actually insects, but arachnids, these creatures are larger than most bugs and make a tasty meal. If their outwardly appearance makes you queasy, just think about crabs and how they look. If you like crab meat, the scorpion’s taste profile is very similar to their underwater crustacean cousins. It’s fun to think of scorpions and arachnids as land based crabs, maybe one day their meat will fetch just as high a price as their marine counterparts.

silkworms, scorpions and crickets to be eaten

Again, in countries outside of Europe and North America, scorpions are relatively common fare. The scorpion is high in protein and makes for a larger meal than a cricket. Growing in warmer climates, such as the tropics and desert biomes, their proximity with most population centers means scorpions and humans have shared a long history together. It is no wonder why these bugs are so ubiquitous open air markets around the world.

Scorpion tips!

Do not eat the last segment of the tail, the stinger is similar to that of a bee and does contain venom. Simply cutting it off will solve this problem.

Where and when to harvest Scorpions

Scorpions are relatively common in the American Southwest. Often, they can be found inside homes and old water pipes. Many people view them as pests and pay expensive fees to try and eradicate them. If you are planning on catching some yourself, winter months are the best time of year to hunt scorpions. During the summer months scorpions burrow deep underground to escape the heat, sometimes at depths greater than 5 ft! The cooler temperatures will ensure scorpions keep closer to the desert surface in order to absorb the sun’s energy as they are cold blooded and the lower temperatures limit mobility.

scorpion on the ground

Look for large rocks with small exit holes in the soil directly beneath them. These exit holes may resemble ant hills and can have loose sand or dirt in small piles near their mouths. These small piles of sand are characteristics of the scorpion’s behavior for excavating its home. Overturn the rock quickly and be ready to move fast. The scorpion will stay immobile for only so long before it realizes it is no longer safe. To catch your scorpion, have a collecting jar and maybe a long stick to carefully pack it into the container. Be careful you don’t get stung; some people have life threatening allergic reactions to the venom of some species.

How to Catch them

Build a trap to save time and catch even more scorpions. Dig a small hole and place a cup inside so that its edge is level with the desert floor. Place jelly on the bottom and come back in the morning. Being nocturnal, scorpions are most active at night and will seek out food in the safety of darkness.

Be sure the cup used is smooth sided, either glass or plastic; you can use petroleum jelly on the rim in order to ensure nothing can climb out. Check the trap in the morning and have yourself a tasty breakfast that’s better than eggs!

Moths

A highly nutritious insect, both adults and larvae, offer a high protein snack. Moths resemble their butterfly cousins, but are nocturnal and have hairy abdomens. Finding them is as easy as overturning rocks and looking under loose bark. You will be amazed at how much food there is in the woods once insects become part of your diet.. When eating moths, I would recommend removing the wings and legs. These body parts offer very little nutrition and are not worth the struggle of choking them down.

Close-up photo of a moth

Still not convinced about moths?  An MSU study found, “ In 30 days alone, the grizzly bears devour at least 300,000 calories from moths, which amounts to about one-fourth to one-third of the total number of calories they need to live for a year.” Grizzly bears can grow as large as 600lbs and must store up enough fat to hibernate during winter months. If a bear can eat moths, why can’t you?

Moth Tips!

Fry them up to mitigate that mushy bug taste!

Where to harvest Moth

 Many species of moths will lay eggs underneath rocks in large rock piles and beneath loose bark. Moth larvae are the easiest to catch and resemble large caterpillars. Their immobility coupled with a soft body makes them both tasty and high in calories. Moths are nocturnal, and during the day sleep underneath loose bark and rocks. Collecting them in these spots can be very easy. After sunset, moths are attracted to the glow of artificial lights.

Yellow and Black Moth on Purple and Green Petaled Flower

When catching them, use this to your advantage! Place a lantern in a dark patch of woods to draw moths in. You can pick the moths off the outside of the light and place them in a bag for collection. Moths are attracted to lights because they believe it to be moonlight. Try trapping moths on cloudy nights or during a New Moon to boost collection rates.

Ants

Perhaps the most pervasive species on the planet, ants can be found on every continent and in every country, minus Iceland and Antarctica. Ants thrive in both the outdoors and around human development. Living in giant colonies, these insects work together with a militant unity in order to collect food, protect the colony, and help the queen thrive. Eating them can be a wonderful experience! High in protein with a sweet flavor, ants are easy to find and provide a quick snack. The larvae are especially tender, being white in color and having no legs. Larvae are completely helpless, making them easy to harvest.

ant-queen on the ground

If you get really good at ant collection, see if you can get yourself the queen ant. The queen is the largest in the colony and her succulent abdomen is the utmost prize.

Ant Tips!

The best way to find ants is to spot an ant hill. This small mound of dirt is made from the tailings of ants excavating the complex tunnel system that makes their home.

Where to harvest Ants

Almost every biome in the world will be conducive to ant collection. A simple walk in a park, or even along a sidewalk will make a productive hunting trip. Once you have located an ant hill, use a long, narrow stick and gently slide it down into the anthill. The ants will swarm the foreign object in defense of their colony. Once your stick is sufficiently covered, shake the ants off into a collection container.

group of ants working

Continue this method until you have enough. Cook the ants individually or as a single mass, experiment with spices to find the best combination. What makes eating ants enjoyable is their exoskeletons, because it gives them a healthy crunch!

Mealworms

Of all the bugs aforementioned, mealworms are the mightiest of all. Containing over 200 calories per 100 grams, these larvae are the king of insect gastronomy. Many food markets in Asia will sell them in great quantities, their cylindrical bodies and whitish color make them easily distinguishable. Easy to find in larvae form, they can also be ground up and turned into flour, making their nutrition more palatable for western consumers.

insects in meal on the plate

Mealworms are larvae, and when they reach sexual maturity, turn into a medium sized black beetle. These adults are edible as well, but their hard shells and thin legs, make larvae a more appetizing life stage for human consumption.

Mealworm Tips!

Throw vegetable trimmings into your mealworm colony to keep them hydrated without growing mold.

Where to harvest

Meal worms have the great distinction of being the “chicken of bugs” because of their ability to be grown indoors and at industrial scales. To do it yourself, take a 5 gallon bucket and fill about ¾ with dry oatmeal. Be careful not to use instant oats because these types of oats do no not offer as much nutrition as basic oatmeal. The easiest way to acquire mealworms is to order a couple dozen offline ( this will not set you back more than $5). Once they arrive, gently place into the oatmeal bucket and poke some small holes in the lid to create a well ventilated container.

Mealworms on a Piece of Potato

Meal worms do not need sunlight and the best course of action is to place the bucket in a cool dry area. Too wet and the oatmeal will grow mold, too dry and the mealworms will dry up.  The oats function both as a food source and as natural habitat for the mealworms. Allow the first two generations to become adult beetles and seed your bucket with eggs. Mealworms take about 90 days to grow from egg to sexual maturity. Once they reach beetle form, their life span shrinks to 1-2 weeks. Be sure to throw away the dead beetles in order to prevent disease from spreading throughout your population. Once you are happy with the amount of mealworms and have a stable population, eat away!

Why you should eat bugs

At this point, you are probably thinking, I could eat bugs, but why? This may seem like a rational question, but it is not. Bugs, like any new food can seem scary, foreign, or even gross, but trust me, they are not! Just because something is new or looks different does not mean it is bad. Don’t just give in to the socially constructed food norms that you were raised in! Think about how much you may like the taste of pork, or beef, what if you find a bug that appeals to you just as much? There is a whole world out there waiting to be tasted.

To help ease your mind into accepting bugs as food, let’s look at some scenarios where you might find yourself eating some of nature’s tiny delicacies.

Traveling

Looking to experience new cultures and foods? Then eating bugs is right for you. If you are committed enough to find yourself thousands of miles from home, then you are committed enough to eat bugs. It is important to note that eating bugs is not weird, or “exotic” it is a way of life for billions of people.

 Insects on plate ready to be eaten

While appreciating life changing experiences on various corners of the globe, don’t forget to let your stomach in on the fun.

Sustainability

Looking for a way to reduce your carbon footprint? Ingesting insects and replacing your main source of protein with bugs will dramatically improve your environmental footprint. Insects are at the bottom of every food chain and if your caloric intake comes from this region of the food web, you are guaranteed to have less of an impact than those who eat other sources higher up. Think about this, most of the fish that you eat, the majority of their diet is made from bugs.

Figs with goat cheese and crickets

Time to cut out the middleman, and go insect!

Survival

Probably the most Hollywood example, but if you’re like me and find yourself recreating in remote regions, this is a likely scenario. The most likely cause of eating bugs is being lost and injured. Being injured limits your own mobility and makes hunting or gathering much harder. The decision to start eating bugs may very well be a lifesaver. Bugs are easy to find, even with a broken leg, it will not be hard to gather enough of them for a meal.

Eating Fried Insects

Calories are important to keep your core temperature high and spirits positive. Eating bugs in a survival situation will allow you to live long enough to be rescued!

Final Thoughts on the Topic

Think you may experience one, or all of the above scenarios? Then it’s time to stop asking why and commit to being an insectivore.

Let’s rationalize the eating of bugs. They are nutritious, high in calories and proteins, and offer the possibility for a complete meal without the environmental impact that domesticated livestock leaves. Multitudes of animals live their entire lives eating nothing but insects, why wouldn’t you eat them, everything else on Earth is!

Besides the environmental and health benefits, insects and bugs are the most common life form on earth. Taking this into account, not eating the most common food source on the planet is the most irrational decision to make. So eat up and experiment with insects!

Fried Bamboo worm larvae at a Thai street market

Edible Snails: When You Don’t Want Fast Food

0
Edible Snails

When most people hear about edible snails, one of three thoughts pops right into their minds. Some people may think “yuck”, others might think of French cuisine, and some might think of both. But there is more to this particular meal than you might think. You may be surprised to find out just how some of this snail eating began and how to get your hands on some snails.

Let’s take a trip through the history of people chomping down on snails, give you a recipe or two and perhaps even a few ideas on where to find them.

History of Snails as Food

Snails have been eaten since prehistoric times. It shouldn’t come as any surprise, snails are a rather slow-moving critter that even the poorest of the hunter should be able to gather up. And since most snails tend to be about 15% protein and 80% water they aren’t too bad of a meal to have.

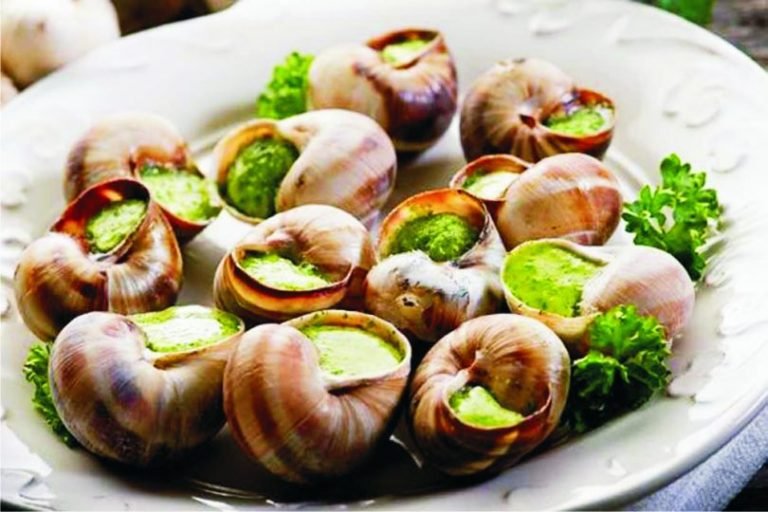
snail-dishes

The Greeks and the Romans ate snails. The Romans would even have special vineyard gardens reserved just for snails. They would feed them such foods as wine and milk to fatten them up for consumption.

Snails became a very special dish for the Romans, and the Roman Legions brought snails with them as they conquered most of the world that was known to them. This may be how the little critters became spread so far and wide across Europe.

During the middle ages, the snail had a special place among all people. First, snails were cheap, often free, so even the poorest people could collect up some for a meal. Also, they were not viewed as fish or as meat, so people could eat them, even on meat-free days as proclaimed by the church.

eatable-snail

Often times, during Lent, the monks would have a dinner of snails and monastery beer. And since snails were so easy to come by, some people realized that they could sell them for a profit.

The snail trade would eventually center in Paris, where, for example, a village that was in the snail selling “business”, was able to sell 4 million snails in one year. Snails grew to hold a very interesting place in food. In some areas, they are considered a meal for everyone, in others, they have become a special delicacy.

Is This the Right Type of Snail

There is a vast array of snails out there and to be perfectly honest, mankind isn’t exactly sure if they are all edible. There are over 100 different varieties that are edible, though, and they cover snails that live on the land and in both fresh and salt water. For the most part, if you are looking for a snail to chow down on you will want either the “helix” or the “achatine”. The helix is the easiest to recognize as they have a spiral in their circular shells.

snails-for-sale

While the Helix pomatia and Helix lucorum are often eaten as escargot, one of the most popular versions is the Cornu aspersum (in many older texts this was referred to as the Helix aspersa). In French cuisine, this little snail is often called “petit gris”, which means little gray. But this snail has a name that might be more well known to you, garden snail.

One thing to consider when eating snails are if there is any chance of poisoning yourself. All snails can have various levels of poison, depending on what they have recently eaten. If you gather up some snails that you find in your garden, there are ways to go about detoxing them, though.

snails-in-thegarden

Some snails though have a bit of a stronger poison. For example, the Marine Cone Snail has a rather powerful poison. They use it to paralyze fish. It is not a snail that you would want to eat, but chances are that an encounter with this snail won’t prove fatal for a human.

Garden Snail’s Journey

This snail started out native to the Mediterranean region and into parts of Europe and even into the British Isles. However, it has managed to spread to every continent on the globe, save Antarctica and to a large number of islands. For some of its travels, it was brought and specifically introduced.

One example of this is when the Huguenots introduced it into South Africa during the 18th century to be grown as a food animal.

snails-are-grown

In others, such as California in the United States, it seems to have just stowed away and found itself a suitable home. This snail has also proven very adaptive, being able to adjust to many and varied climates that are quite a bit different than their original habitat.

Where to Find Snails

Depending on where you live you will have a few options of where to track down some nails to munch on.

Snail Shop

Some areas will have snail shops that you can go to pick up your fresh snails. The upside to this approach is that you know the snails will be safe to eat and be already detoxed. This means that if you are looking to have snails right away this would be your best option.

snail-shop

Depending on how well stocked the snail shop is you might have the option of both fresh and canned snails. There may be a wide variety of snail species to choose from. Also, a well-staffed snail shop, will help you to both make an informed selection, as well as give you some pointers on how to prepare them.

The Internet

If there are no snail shops in your area, you can always look online to order some snails for your meal. There are plenty of options, such as this can from Amazon. This means that you get specialty snails from all over the world. Now the downside is that you will only really be able to get canned or jarred options. If you have never had snails before this might not be a bad idea, but you won’t be able to experience fresh snail this way.

Also, when planning your meal, you will need to factor in shipping times, or of course, you could just keep a few cans in your pantry. These cans have quite the long shelf life, so you can put them in the pantry and just have the ready for when it is time to cook some up.

Collect Your Own

Of course, if you have snails in your garden or around your property you can collect up your own. You will want to double check that the snails you are gathering are the correct type.

garden-snail

If you find them in your garden you are probably all right. If you find them along your fruit trees, though, they might be from a different species that is protected. Be sure to check in your local area to make sure that you aren’t eating a protected species.

One way to catch some snails in your garden is to take a board around a foot by a foot and a half and attach pieces of wood to raise this board up about one inch. Put this out into your lawn or garden over a damp area. Since snails tend to seek out wet or damp areas the snails will flock to these boards. You can check the boards every few days and just pull off whatever snails you find there.

A second way is to find a bowl and bury it to the point that just about an inch is exposed over the top of the soil. Then you merely have to pour some beer into the bowl, if you don’t want to use beer combine two cups of warm water with a half teaspoon of yeast, two tablespoons of flour and a teaspoon of sugar.

bowl-for-a-snail

This type of trap will attract snails from only a few feet away so if you need to cover a large area you’ll need several such traps. Also after a day or so the beer or yeast mixture will need to be refreshed.

You will need to remember that you will need to put your snails through a detox prior to eating them. The process will take a few days, so you will need to factor that into your plans for snail collecting.

Farm Your Snails

A final way to get snails for you to eat, is to farm your own. This practice is called Heliciculture. One of the perks is that if you farm them you can, for the most part, skip the detox process. And in addition to snails for consumption, there are some other products that you can collect from snails. There are people that collect the slime trail from snails in cosmetics and others use snail eggs as a type of caviar for humans to eat.

snails-farm

As if raising your own snails with the possibility of selling them and other products wasn’t enough, you can also raise other types of snails. You may have to do some research to get your first set of snails, but if you get the chance to bring in some snails that are not otherwise available in your area, you might find yourself in a nice little niche.

Shell Options

As we get to cooking the snails you’ll have to determine if you will want to serve your snails with the shells or without. Without, is the easiest option, since it won’t matter if you break some shells along the way. With is a little bit trickier, but you have options depending on how you get your snails.

If you are farming your snails or just captured them and have time, feed them crushed oyster shell for a period of one to two weeks. This will boost their calcium and toughen up their shell. After that, you can proceed as normal.

snail-shell

If you would rather just have a set of shells to serve with this dish, you can look around in search of gros blanc shells. These are from larger snails, and tend to be a bit tougher.

Detox Process

We have mentioned before that for the most part land snails aren’t poisonous, but they can pick up some amount of poison based on what they eat. Also, their flavor can be changed based on what they consume.

If you are farming your own snails you will be sure of what they eat, but even if you find some in your garden you can’t be sure of everything that they’ve been eating. Luckily, the process is not complicated, it just takes some time to work through the process.

snails-in-a-container

There are two different options on how to detox your snails. The first is to put your snails in a container (with plenty of air holes) and keep them from any food. They can be given water or wine during this time, though. The second route starts by putting the snails in a container with plenty of air holes and feed them something like oats for three or four days. After that, you will have them fast for another two days.

No matter what option you go with, you’ll want to de-slime your snails as well. You’ll put all your snails in a container and cover them with water. For each dozen snails, you’ll want to add a tablespoon of vinegar and two of sugar. You’ll then let them soak, until the snails let all of their slime go.

snails-on-the-plate

This process normally takes four to five hours. You can speed up this process by changing out the solution they are soaking in. Next, you’ll want to rinse the snails off in cool water.

Cooking Snails

There are a vast number of ways to cook a snail that is to be consumed. The classic French method involves butter and garlic. But for a little more detail, let’s start with the snails that have been detoxed and de-slimed. At that point, you’ll want to toss them in some water and bring them to a boil.

This is only the first step, so you aren’t looking to have a completely done dish. We only need about 10 minutes of boil here for our purposes. After this, you’ll want to remove the snails from the water and let them cool. The next step is to remove them from their shells and here you will have a choice.

cooking-snails

If you want to serve them in their shells you will need to be rather careful while you extract them. Some people use a long knitting needle to spear the snails and pull them out. While different species of snail have shells of different hardness, if you have a garden snail or petit gris, it most likely has a somewhat delicate shell.

Of course, if you don’t intend to use the shells for serving your snails it is a much quicker process, just be careful that any shells that break in the process are completely removed from the snails you intend to eat. When the shell is off, you should have no problem peeling the skin from the meat. Normally, you will also cut off the back tail portion.

Method 1: Quick and Easy

Now that you are ready to finish this dish, you’ll want to heat up a sauté pan with some butter. When it is ready you’ll want to add in some garlic, when that becomes transparent you can add in the snail meat. You’ll want to cook it for about 3 minutes.

snails-on-tha-plate

Method 2: A Touch Longer

For a different approach, you can place the snail meat into a pot and cover them with water. Feel free to pour in a bit of cognac or replace half the water with a white wine. From there you’ll add in whatever flavors you feel would work well, but a wise idea would be to include peppercorns, parsley, thyme, onions, and garlic. Let this simmer for a few hours. During this time, you could prepare a compound butter.

Simply take some butter (no imitations like margarine for this one please) and add in some chopped parsley, a touch of garlic and perhaps a pinch of salt and pepper. Mash it all together, then put it back in the refrigerator until it is time to serve the snails.

Service Options

When the time comes to remove these snails from the cooking vessel and serve them to your guests you have a number of options. If you want to go formal there are various serving dishes that can be found online. These will let you place each snail, either in its shell or not, into its own groove.

cooked-snails-on-th-plate

Sometimes guests will take a snail in a shell, or more than one, to their plate to consume it. Other times, everyone will end up eating snails right from this dish. This method is often paired with specialized forks, designed to spear a single snail and bring it to the diner’s mouth.

For something less formal, but still elegant you can dish out an amount to each person’s plate. For a basic pairing, you can add a salad and perhaps a crusty French style bread. This will give you a meal that covers all the bases, looks like it came from a fancy restaurant, but is fairly simple to make. No matter how you make them, they would pair well with a bottle of French wine.

Wrapping it All Up

Snails can be a cheap and easy source of food. Some people might think they are an odd thing to eat, but when you consider the fact that these little critters have been consumed for thousands of years, they become less odd.

They have been food for peasants and royalty alike, yet edible snails can be found for free in many corners of the world.

baby-eat-snails

Freezer Bag Cooking: Saving You Time and Energy for Your Outdoor Adventures

0

We need to fuel our bodies during our outdoor times, thus the freezer bag food is convenient. It offers variety and simplicity since one has no need of moving together with his or her utensils since most of the outdoor activities involve groups of people though individuals still have a share. Freezer meals can be referred to as portable food that comes handy during the outdoor times. A freezer storage bag is used and it’s structured in that it’s a recloseable multi bag, which includes an inner liner bag and an outer support bag. Both liners are thermoplastic.

The freezer bag cooking method is preferred because it saves time too, since the outdoor activities like hiking, biking, paddling, etc. use a lot of time and few people would like to be involved in cooking or carrying a variety of traditional ingredients to cook; it becomes hectic. The freezer bag meals become great for the company of friends or family. The food is frozen ahead of time for the activity or outdoor tour, labeled and well stored. They are ready for feeding, only some water is added and the food is good to swim down the gullet to the stomach.

Black Rice Pudding with Coconut & Lemongrass

While selecting foods to freeze, one has to select those that freeze well and also keep in mind the right way of freezing the various types of food. To add to that, they should also be labeled and packed differently as in breakfasts, main dishes, and desserts. Proper packaging maintains the color, flavor and moisture content of the food. It’s preferable to store food in smaller freezers since bigger freezers will freeze the food slowly and the result will not be satisfactory in terms of quality.

Advantages of the freezer bag food are that it saves money by preparation of less expensive foods or even inexpensive meals and also saves on the food wastage by reducing it. Freezing preserves food, hence improving the safety of your health. It enhances bonding in the groups involved, may it be a family or a group of friends, since it feels good to share food and time together during the meal time. Moreover, it saves on decision making on what to eat at a given time, since it’s well packed, and also reduces the workload since the group involved shares the packing and preparing of the frozen food, thus reducing human effort.

crock pot freezer meals

On the other hand, it has some nutritional disadvantages since frozen food tends to have a high amount of sodium as compared to the fresh foods. High levels of sodium in the blood affect the body by causing high blood pressure, chronic kidney disease and maybe diabetes. Other frozen foods may contain high amounts of fat and calories and since one feeds on it fully, he or she ends up consuming a lot of fat.

Apart from that if the food is not well frozen that gives a back door to microorganisms that come and cause food spoilage and also food poisoning. One needs to be careful while freezing the food. Freezing also leads to changes in the food texture from the fact that freezing changes liquid water into a solid, leading to expansion, thus affecting the food texture and some vegetables with a high water content appear withered after thawing. Freezer burns, as a result of evaporation of ice crystals, cause food to toughen and dry out.

HOW TO PREPARE A FREEZER BAG MEAL

Here are a few steps that will make the process of preparing the freezer bag meals faster and more enjoyable:

  1. Get the ingredients required for the outdoor activity and they should go with the number of people involved. It’s advisable each one to bring his or her favorite ingredients for a certain meal to be prepared. For fruits and vegetables in the morning while fresh is preferred or later in the evening so as to maintain their flavor and color too.
  2. Prepare favorite soups and recipes that freeze well after cleaning them thoroughly and then place them on a cooling rack slightly at room temperature before undergoing refrigeration to allow circulation of air all Maintain the depth of the food at around 2 inches. The food should be slightly undercooked if it will be reheated there after the freezing for convenience.
  3. Prepare to cool the food at refrigerator temperature before bagging them. Loosely cover the cooling food to allow heat loss and protect food from accidental contamination from other foods during the cooling process.To speed up cooling one can divide the food into smaller portions
  4. Now look for the freezer bags for storage of food in the freezer. They keep food fresh for a longer time and are quite efficient and convenient. Quick freezing is convinient since it prevents foods from sticking together. A thin, flattened shape freezer is preferred for its fast freezing and hasten thawing.
  5. Label the foods to avoid mystery of foods. One can use a permanent marker on the outside of the bag or a freezer tape, gummed freezer labels . On the label some of the important information that should appear include: amount of food in the freezer bag, packaging date, name of the food, number of servings, notification if special ingredients have been added, form or nature of the food(chopped, sliced).
  6. Lastly, place them in a freezer and it’s better for the freezer bags to be placed on a flat surface in the freezer. One should avoid placing the food in the freezer if it’s hot or warm since it can heat the other foods in the freezer leading to rise in temperature thus affecting the storage of the food. After freezing they can now be stacked directly on the freezer shelf or store vertically especially when freezing liquid foods.

When it comes to feeding, the foods are thawed carefully and differently depending on the class of the food.Perishable foods have a specific temperature that must be reached during thawing for better taste and efficiency.

Labels on the freezer meals bags

Some vegetables can be cooked while still frozen thus no need of thawing while fruits can be thawed in a refrigerator or a microwave or even at room temperature. Immediately after thawing it’s advisable to cook the food to kill any bacteria that can have entered during the process.

FREEZER BAG RECIPES

The following are examples of freezer recipes that one can consider when planning for an outdoor activity that can take some time away from home.

Meat Sauce Mix

You will need the following ingredients:

  • A sizeable amount of ground beef or turkey
  • A medium minced onion
  • A can of tomato paste and some water or a can-full of tomato soup
  • One teaspoon of garlic powder
  • A teaspoon of salt too

Lean meat with drained fat, add the ingredients and simmer for about 30 minutes Add water to the food or tomato juice if necessary, depending on your taste Brown meat; drain fat. Add all other ingredients.

meat sauce mix close-up photo

Place one cup of the sauce in a freezer bag and freeze.

Easy, Cheesy Pasta

Ingredients:

  • 2 cups of Meat sauce mix
  • 2 cans of chili beans
  • 4 cups cooked, drained macaroni
  • 1 cup grated mozzarella cheese

Mix together, chili beans, meat sauce mix, and macaroni. To them add a half cup of grated cheese. Place the mixture in a freezer bag and label it appropriately. Then place it on a metal pan or saucepan and heat over until bubbling occurs. Add some water if the mixture becomes dry.

Cheesy Pasta with Meat Sauce

Add a half-full cup of the remaining cheese over the pasta as it is served and place the remainder in a freezer bag and label it and tape it to the pasta mixture.

Trail Rice Pudding

In a medium size freezer bag, add the following:

  • One cup of rice
  • Cup half-full of whatever small dried fruit one may prefer like raisins
  • Quarter dry milk

In a second freezer bag, add the following:

  • A package of pudding mix, depending on your favorite flavor
  • Add some powdered milk and should be about a half cupful
  • Add a cup of some boiling water to the rice bag and let it cool off for about ten minutes
  • Add two cups of cold water to the pudding bad and shake vigorously making sure no powder decides to settle in the corners.
  • Let the well-shaken pudding sit somewhere.
  • The mixture of both bags gives a nice delicious dessert, especially if it has thickened well enough.

Trail Rice Pudding

Scones

The scones can be perfectly packed well in a plastic wrap are even better when crumbled.

The following ingredients are needed:

  • Three cups of flour, the all-purpose kind
  • A half cup sugar, especially the white one
  • Some four teaspoons of baking powder
  • A half-full teaspoon of salt
  • A three quarter-full cup of butter
  • A cup of milk
  • 1 beaten egg

Raise the temperatures of the oven to about 300 degrees Celsius and then do some greasing or spraying the baking sheet. Combine all the dry ingredients in one big bowl and a cut of butter. Mix up the beaten egg and the cup of milk and add flour until it becomes moistened. Turn the dough out onto a lightly floured surface and knead for some time until it becomes less sticky. On a flat surface lay the dough and pat it to about a half an inch in a circle.

Fresh Apple Cinnamon Scones

Cut it into around eight to nine wedges and put them on a baking sheet. Bake it for about a quarter and hour till it becomes golden brown.

Banana Bread

In the ingredient list or shopping list the following have to be present in order to cook the banana bread:

  • A couple of one and a quarter cups of smashed potatoes
  • A cup full of some sour cream
  • Another cup, quarter filled with margarine or butter
  • One and a quarter cups of white sugar
  • Two eggs
  • A teaspoon of vanilla extract
  • Some two cups of the all-purpose flour
  • A teaspoon of baking soda
  • One teaspoon of baking powder
  • A pinch or quarter teaspoon of salt

Let the oven temperatures reach 350 degrees Celsius. Use the margarine or butter to smear on two loaf pans. Put together banana and sour cream and set them aside. In a big enough bowl, cream together margarine or butter with the sugar until a smooth gravy is formed.  Then beat one egg at a time, and then stir in the vanilla and banana mixture.

Banana Bread on the Table

Put together the flour, baking soda, salt, baking powder, and cinnamon. Stir them into the banana mixture. Spread the butter nicely and evenly into the prepared pans of bread, and then bake for about 50 minutes in the preheated oven, or till when a clean toothpick is pushed into it, and if it comes clean you have a well cooked meal. The loves now can be wrapped and frozen for later eating.

Spaghetti

Some vital ingredients in order to cook spaghetti includes:

  • Two cups of meat sauce mix
  • One and a half Italian seasoning or pasta
  • Parmesan cheese which is optional

To make pasta:

Put together the meat sauce mix together with the Italian seasoning or pasta ( either of the two). Label it and include some instructions that will state “heat the contents in a microwave till they are thorough”. In a sizeable pan boil some three quarters of water and add a teaspoon of vegetable oil to reduce the boiling over. Add pasta gradually and boil them uncovered stirring occasionally.

Spaghetti with Meat Sauce

The results of the pasta should be tender and firm. Then immediately empty them in a colander and do not rinse since it washes away valuable nutrients. On the hot cooked pasta pour meat sauce and sprinkle some parmesan cheese.

While freezing for later feeding, the pasta noodles should slightly be undercooked so that they do not get mushy way afterwards.

Chocolate Popcorn Trail Mix

Ingredients:

  • Have some two squares of semi-sweet baking chocolate
  • Some two of popcorn (microwave popped)
  • A cup of Craisins
  • Two cups of frosted wheat cereal

Melt the chocolate in a bowl that can withstand microwave conditions and stir it till it is fully melted. Add other ingredients of choice and toss fast to coat it. Cool nicely on a wide surface of wax and then store in freezer bags that are tightly sealed.

Banana S'more Popcorn Trail Mix

Freezing bags are wonderful companions in outdoor activities or picnic away from home.

Wrapping it Up

There you have it, all the reasons why you should start preparing freezing bag meals for your outdoor adventures. Most people do it because it saves you plenty of time while you are hiking, camping, or having any outdoor related activities. Furthermore, it also saves your energy, you would otherwise use for cutting, mixing, and cooking the meal.

Freezer Crock Pot Recipes

Best Hiking Snacks: Homemade Delicious Snacks for Hikers

0
close-up picture of nut bars and dried figs

Hiking is an exercise-intensive excursion that needs proper preparation, from sufficient nutritious foods to delicious and nutritious snacks. You also have to bring along enough water, and other refreshing fluids such as the juices to your hiking expedition. But only healthy ones combined with healthy snacks please! The mistake that most of us do is to pack irrelevant and unhealthy snacks for our excursions.

Note that hiking, due to its inevitable exposure to unpredictable temperatures and energy-demanding trails, requires a careful selection of snacks just to spice up and refresh your journey. Check our meticulously compiled list of the best hiking snacks below to pick your desired ones.

Our list of the best snacks for hikers is predominated by homemade snacks because we strongly believe that they are cost-effective. When hiking, you do not have to break your bank by over-spending on the purchase of all essentials needed, whereas you can cut the costs significantly by doing lots of foods and snacks on your own. But then, you need to be a hobbyist in cooking to avoid terrifying your stomach with non-delicious intakes. I’m joking, I know you are indeed a good cooker…

Strawberry Fruit Leather on the Table

Now bear with us as we give you tips on how to prepare these snacks beforehand. If you decide to buy, instead of doing the snacks on your own, it’s still a great deal but just make sure you buy the best food. Let’s give you tips first that what to consider before popping out your hard earned cents.

Important tips to consider when buying

Surely you know that snacks’ selection for household consumption and for wilderness consumption is significantly varying mainly due to unstable temperatures in the wilderness and the inconvenience of having refrigerators or coolers. The wilderness unstable temperatures and uneven trails dictate our choices when buying snacks. Having noted that, you should be cautious about the types of food to buy. Take into account the questions mentioned below before making any purchase.

How many days will I be hiking?

The longer days you hike is the more snacks you will need. But, importantly, the perishable snacks such as the sandwiches and yoghurts have to be avoided more especially because traveling with your cooler will be impractical. Instead, consider non-perishable homemade snacks that are lightweight to last you many days in the wilderness.

hiker sttting on a rock and watching the landscape

For handy cookers, we’ve got you covered below with the selection of homemade snacks that are great for hikers. But, if you are going to stay longer than a week in the outdoors, we reckon that you plan your eating schedule to avoid depleting the snacks before your activity-driven excursion matures.

How long will I be hiking?

The longer the trail is the more snacks needed. Even if the trail is to be traversed in a day or two, you need refreshing snacks when you rest amid your hiking journey. How about treating yourself with granola or energy bars or some dried fruits? And the delicious beef jerky and whole-grain tortillas, how about refreshing with them? The choice is yours.

picture of a backpack on the ground

If you are going to hike for a day, perhaps perishable snacks can be a good choice but provided they are stored in lower temperatures.

How will I eat?

Although we emphasize having snacks for your route, they should not be taken on their own. The best choice is when you eat them as supplements to your normal hiking foods because the snacks alone may not give you the desired energy to complete your journey. Either way, you need a good combination of snacks and foods.

jar with snacks on the side

Overeating, for example, may negate the need for snacks thereafter.

Will it cost me more to buy than to make on my own?

Ready prepared snacks found in grocery stores are notoriously costly compared to the homemade snacks. Remember  that your local store is determined to get profit, and their supplier too is also determined to get profit.

balancing some coins and a potato

So, making your own snacks will be the best ideal, well it all depends on the type of snacks you want. Simply buy the recommended recipes and prepare before time.

Is it viable to travel with a cooler?

If it’s not viable, then why bother buying perishable snacks, knowing very well that they might decompose? Hikers are not fond of heavy tools not even their gear because that could be a burden to their activities. So the cooler is often the last thing in mind when you are faced with steep mountains to climb for hundreds of miles.

This mistake of perishable snacks is prevalently committed by beginners. Please do not fall into the pit too. Well, unless you are traveling with a car, then a cooler might be a viable option and, in turn, such snacks shall be viable too.

backpackers climbing the mountain

Up to so far, we’ve done our best to guide you before you can purchase the snacks for your hiking expedition. Now let’s further discuss our core recommendations of homemade snacks. Before we delve into the list, please note that you are welcome to amend the recipes to your liking but meticulously.

Delicious Homemade Recipes

Pumpkin Seeds with barbeque or seasoned salt

Treat yourself with pumpkin seeds tossed with either a seasoned salt or barbeque. This could be your favorite snacks for subsequent hiking excursions you’ve planned. How to prepare it?Simply get raw pumpkin seeds from any store or collect the ones you left when cutting pumpkins, and then rinse them in a strainer to separate the seeds from the pulp.

The next steps:

  • Preheat the over to about 380 Fahrenheit degrees and then put a stainless steel vegetable rack inside to put the pumpkin seeds while roasting them in a baking sheet.
  • But put 2 spoons of oil before, and then stir frequently after 5 minutes until your pumpkin seeds are crisp and brown in color.
  • It could take about 15 minutes to be fully cooked.
  • Then remove your snack from the oven and sprinkle with seasoned salt.
  • The option of serving them with a barbeque spice requires the addition of barbeque and the 2 teaspoons of salt while in the oven. Your snacks will be ready to pack.

Pumpkin Seeds with barbecue

Chocolate Bar

If you are like me with the obsession of chocolates, this snack is definitely for you. These chocolate bars are not only super-healthy for your body, but also incredibly delicious provided you make them perfectly. How to make them?

Well, you need to buy a brown rice syrup, flax seed meal, crispy brown rice cereal and a wheat germ. You can find these recipes in your local health or grocery store. Subsequently, you should follow the steps as recommended below:

  • Preheat the oven to 350 Fahrenheit degrees and put a rack in the middle.
  • Then coat the butter on your baking pan ready to put your mixture
  • Use the baking sheet to put the coconut, flax seed meal, almonds, oats, brown rice cereal and the wheat germ and then mix them before baking them.
  • Then take the cooked contents to the rack.
  • Put the brown sugar, cinnamon, peanut butter, salt, vanilla, and brown rice syrup in a saucepan preheated to medium heat.
  • Stir until the sugar has dissolved in the mixture, and then pour them in the baking pan prepared.
  • Then sprinkle the contents with chocolate chips and put them into the oven preheated at 350 Fahrenheit degrees until the crisps have melted.
  • After that, remove the contents from the oven and spread chocolate into the contents.
  • Cool the mixture on a rack and then store in a refrigerator for about 30 minutes until it has frozen
  • Then remove to cut into bars and then wrap them in a plastic wrap.
  • Freeze the bars for a few weeks before embarking on your journey.

Homemade Chocolate Bar

Cherry Bar

You can revive your morning with this cherry bar to energize your body before your next hiking adventure. Nothing beats the deliciousness of the oats, flax seed, wheat germ and the nuts in this bar. To make this cherry bar, buy the oats, wheat germ, flax seed, and nuts in your local health or grocery stores.

Then follow these steps to prepare your power bar:

  • Preheat the oven to 350 Fahrenheit degrees and put the rack in the middle of the oven.
  • Meanwhile, spread a butter in a baking pan and put it adjacent to the oven
  • Then take oats, coconut, flax seed, wheat germ, almonds, and walnuts and put them on a rimmed baking sheet. Mix the contents with your hands and the bake them while stirring regularly until the nuts have turned golden brown.
  • Subsequently pour the contents into a wire rack that is prepared in the oven. Reduce the oven heat to 300 Fahrenheit degrees.
  • On the other side, prepare brown sugar, honey, cinnamon, vanilla, butter, salt and put them in a saucepan. Fry until you get a smooth mixture wherein the sugar has dissolved.
  • Add oat & nuts mixture and cherries to the saucepan after removing the saucepan from the heat, and transfer the contents to the baking pan prepared initially.
  • Then bake the contents until you have a pleasant smell and then cool them.
  • The next step is to cut the slabs into bars and wrap them in a plastic wrap to store or freeze them before you go hiking.

Close-up picture of homemade Cherry Bar

Strawberry Fruit Leather

No one can say no to the mouthwatering strawberry fruit unless allergic to it. Now we help you prepare a delicious leather made of strawberries only. Follow the steps below:

  • Prepare the oven and preheat it with the rack in the middle.
  • Then prepare a rimmed baking sheet with a silicone baking mat next to the oven
  • Take strawberries, salt and sugar and put them in a blender and blend them until you get a smooth mixture.
  • Subsequently transfer the mixture into the saucepan using the fine-mesh strainer. Use the spoon to force through the mixture until seeds remain, then remove the strainer to disperse the seeds.
  • Put the saucepan over a medium heat to cook the mixture. Keep stirring the mixture until it thickens and then remove the saucepan.
  • Combine the contents with lemon juice and then put them in a container to cool. Then transfer them to the baking mat in a form of a rectangle and spread evenly.
  • Then grab the edges of the rimmed baking sheet and shake it.
  • Put the contents in the oven until the fruit leather is a bit sticky. It can take about 5 hours to fully cook that. Then remove the sheet from the oven and cool it. You can pull out the cooked fruit leather and transfer to another sheet using kitchen knives to cut through to form desired shapes and then roll them. The fruit leather will be ready to store before you take your journey.

Strawberry Fruit Leather on Wooden Table

Thai Beef Jerky

Now try a Thai beef jerky as your best snack for hiking. It can be served with coconut sticky rice or just on its own. Experiencing new things is a pleasant and incredible feeling for any explorer. How to prepare this snack?

Before we continue, make sure that your oven has a dehydrate setting more especially if it’s new. So, to start with:

  • Prepare a meat flat on a baking sheet and wrap with the plastic wrap. Then freeze the meat for about an hour
  • Next put the meat on a cutting and remove any visible fat on it.
  • Then make slices of about quarter an inch in thickness.
  • Coat the beef strips with the marinade and then subsequently put them covered in the refrigerator for more than 10 hours.
  • Next, remove the meat from the refrigerator to remove excess marinade and store it in a room temperature for half an hour.
  • Prepare the oven and align the foil on the bottom and then preheat it to 160 Fahrenheit degrees.
  • Then put the beef strips on the racks in a vertical or horizontal direction while the racks are removed from the oven.
  • Now, as aforementioned, use the dehydrate setting to dehydrate the beef strips on the racks when put in the oven.
  • When completely dry, you can store your Thai beef jerky now.

Thai style fried sun-dried beef jerky

Turkey Jerky

How about we combine the beef jerky and the turkey jerky on our to-eat list? That could be a great menu for your excursion with a salty and sweet jerky with spicy marinade to make it incredibly tasteful. What you need to buy is a chile-garlic paste, salt and of course marinade ingredients and the turkey.

Let’s help you prepare it below:

  • Prepare a turkey breast flat on a baking sheet and wrap in a plastic wrap and freeze it for about 2 hours.
  • Remove it and put it on a cutting board. If there are visible fat on the turkey please remove them and then slice the turkey into quarter strips to marinade them.
  • After marinading the strips, wrap them and then refrigerate for more than 10 hours.
  • Subsequently remove the turkey strips from the refrigerator and then trim off the excess marinade. Leave them for 30 minutes at room temperature.
  • Remove the racks from the oven and then align the foil in the oven before you preheat the oven to 160 Fahrenheit degrees.
  • Spray cooking spray onto the racks and then align the turkey strips on them.
  • Take the racks back to the oven and dehydrate the turkey strips until completely dry. Then remove the turkey jerky from the racks after removing excess oil on it. You can then store your jerky to take along on your next expedition.

Close-up photo of homemade Turkey Jerky

Granola

Now treat yourself with granola, which can be served with dry fruits or nuts. The granola blend can actually be customized to your preference. Honey and salt are still the great combinations as well. How to make this incredible recipe? Check out below:

  • Preheat the oven to 300 Fahrenheit degrees and put a rack in the middle
  • Prepare cinnamon, oats, salt and brown sugar in a bowl and mix them
  • Stir another mixture of honey, vanilla and oil separately in another bowl
  • Transfer the mixture into the oat mixture until oats are fully coated
  • Then put the overall mixture on a rimmed baking sheet and then bake for about 15 minutes until the granola has turned golden brown.
  • Subsequently put the baking sheet on a rack to cool the granola until it hardens after approximately 20 minutes
  • You can then add your desired dried fruits, seeds or nuts to the baking sheet to combine with the granola, and store it for about 2 weeks prior to hiking.

Homemade Granola Bars on the Table

Nut Bars and Dried Figs

Here’s another exciting snack for your hiking journey. You need a candy thermometer as an indication that he honey mixture is fully cooked when preparing these snacks. Let’s help you prepare them below:

  • Preheat the oven to 300 Fahrenheit degrees.
  • Then chop almonds and hazelnuts
  • Coat the pan with flour and butter
  • Then mix cocoa powder, flour, cinnamon, cloves, orange zest, and fennel seeds together in a separate bowl.
  • Add nuts and figs in the above bowl until they are fully coated
  • Prepare honey and sugar in a saucepan and place them over a low heat and then gradually increase the heat until the thermometer reads 245 Fahrenheit degrees as an indication that the mixture is completely done.
  • Then pour the nut mixture and stir, for the dry ingredients to be coated.
  • After that, you must transfer the mixture into the pan to bake it until a toasty aroma results. It can take about 30 minutes to fully bake it.
  • Subsequently remove the mixture from the pan and cool it. Then cut into bars to serve.

Dried Fig and Nut Bars

Wrapping it up

The list can be endless if we want to compile all the best snacks in the world. We have nonetheless brought the best choices to prepare yourself, although not all-inclusive. Obviously it’s a matter of personal preference to make an ultimate decision that which one can be best for you. However, we guarantee you that with these homemade snacks aforementioned, you will enjoy your hiking experience knowing that you have not broken your bank to have them.

Moreover, they can withstand any wilderness weather condition that you come across. But do not forget some fluids to drink in combination with these snacks. Water is a must-have.

Nuts mix in a wooden plate

Camp Stove Recipes: The Best Recipes for Your Camping Needs

0

Camp stoves are the best reliable fire sources for outdoor hobbyists. Most of them use propane or gas, even though the propane stoves can be relatively expensive, but are reliable. But, getting the best stove is half-way to making your outdoor stay pleasant.

The big things to get are the camp stove recipes that will leave you impressed or impress your companions. We will provide you with the best recipes for your camping needs in this article. Even more, we will provide the camp stove cooking techniques.

To make camp stove cooking a cinch, you need to have the right cooking supplies. Some of these supplies include the following:

  • Have a reliable camping stove powered by gas or propane
  • Lighter fluid or a box of matches
  • Lightweight saucepan or pot
  • Other kitchen gadgets like bowls and aluminum foil

Cooking in the wilderness can be demanding, from preparing your meals, to cooking them and to cleaning the mess that’s left after cooking. You need some sort of ingenuity to achieve cooking foods out of your kitchen in the outdoors.

picture of a Coleman double burner propane stove

We’ve noticed that much of the work can be halved by following the simple techniques of preparations. We provide you such preparation techniques below.

Camp Stove Preparation Techniques

  • Prepare the recipes beforehand. This reduces your preparation time at the camping site because measuring ingredients and mixing according to the instructions can be lots of work. Some require numerous bowls and oven preparation. You will have to mix your ingredients accordingly and store in zip lock bags. And also remember to freeze other meat recipes to lengthen and retain their freshness.
  • Stews and soups should be prepared ahead of time too and be frozen. It will be easy to reheat them with your camp stove when you reach your destination.
  • Of course do not forget your kitchen tools when heading to your camping, because you will need them to cook or reheat. Spoons, bowls and aluminum foils are indispensable for your cooking needs. Take extra aluminum foils because, depending how long you are camping, you will need more.
  • When packing your goodies, separate them in their respective containers label them accordingly. And if there are some cooking instructions you think you might forget, write them clearly for later referral.
  • Freeze meat and beverages before packing them in the cooler. This will help keep other foods cool as well.
  • When packing your gas canisters, please put them upright always and store in a ventilated side.
  • And when cooking, make sure your pots or pans are always covered to shorten the cooking time and to also save fuel for your long days of camping.
  • Your cooking hardware should be fireproof. And make sure that the handles are kept away from the hot plate because they might burn you when you remove the pot or saucepan.

These are essential guidelines you should keep in mind before cooking your camp recipes. We’ve done our half job in advising you with preparations. Much of the work should be done by following the instructions on each packet of the food purchased. In our recipes below, we will provide you with the ingredients for each food to prepare, and also provide you with the methods/instructions.

picture of a man cooking with a camp stove

Our recipes are randomly provided without any sort of categorization into breakfast, lunch or dinner. However, we strongly believe that the recipes are versatile enough to be considered for the entire day of hiking. Please note that our suggestions are purely estimated amounts. So you can amend them based on a number of companions you camp with.

Recipes for the camp stove

Cowboy chicken & bean stew

The cowboy chicken and bean stew can best be prepared for your lunch or dinner after a long day of trekking in the wilderness. This recipe is sure to provide you with ample energy and nutrients to replenish the ones lost during your outdoor activities.

It takes about 10 minutes to prepare and an hour to fully cook it, well depending on how hot your camp stove is. And a maximum of 4 people can be served. To prepare this recipe, you need the following ingredients:

  • Chopped Onion, oil, 8 chicken portions, smoked paprika teaspoon, 400g can of chopped tomatoes with garlic x2, 200g BBQ sauce, chopped smoked streaky bacon x6, mixed dried herbs or dried oregano teaspoon, tortilla chips, grated cheddar and 400g can of pinto beans x2.

Once you have these ingredients ready, you can continue with the method of cooking as follows:

  • Prepare a pot with a lid and then preheat the oil to medium heat.
  • Prepare onion and bacon in the pot and cook for 15 minutes until the onion turns brownish and the bacon appears crispy
  • Then add chicken and increase the heat of your camp stove/oven to high until the chicken turns brown as well
  • Add the tomatoes, paprika, BBQ sauce, mixed herbs, black pepper, ¼ teaspoon of salt and about half a cup of water.
  • Then close the pot with the lid and stir the meat periodically until well cooked for about 45 minutes
  • If the chicken is not yet tender, you can increase the cooking time, perhaps by 15 minutes
  • Remove the lid and add the beans and leave the pot for about 15 minutes until the sauce thickens.
  • You can then serve the meal and add optional toppings such as the tortilla chips or grated cheddar.

Picture of Cowboy chicken & bean stew

Chicken and Vegetable stew

You never go wrong with the chicken and veg stew. It is such a delicious camping meal that can be consumed regardless of the seasonal change. Whether you camp during winter or summer, it is still ideal for you. And to make this meal, you need the following ingredients:

  • Chopped onion, 2 crushed garlic cloves, 2 spoons of veg or olive oil, 2 sliced carrots, sliced fennel bulb, boneless chicken thigh or breast fillets, cut into larger pieces, waxy potatoes, diced pumpkin, and optional 200ml white wine glass.

To prepare your appetizing chicken and veg stew, follow our method below:

  • Preheat olive or veg oil in a pot and put on the camp stove
  • Then cook garlic and onion for about 10 minutes while stirring until they turn golden brown. Keep the heat to medium to avoid burning your contents.
  • Then add carrot, fennel and pumpkin and continue cooking for about 5 minutes while stirring occasionally
  • Add the chicken pieces into the pot and continue stirring until the chicken turns golden brown as well. Meanwhile, add the 200ml of wine and cover the pot to boil for about 2 minutes.
  • Subsequently pour about 1 and a half cup of water into the pot to prepare for the stew. Add the potato, a pinch of salt, and a black pepper.
  • Then cover the pot and cook for about 30 minutes until the potatoes are tender
  • Take the spoon to taste the content. If satisfied, you can then pour into bowls and let it cool before ingestion.
  • 290g pack pizza dough mix

Chicken and Vegetable stew

Frying pan pizza pie

Who said only professional restaurants are well-rounded in making pizzas? Even a well-trained teenage girl or boy can do that successfully. To make this pizza pie, make sure you have the following ingredients ready:

  • Flour, 1 teaspoon of tapenade or pesto, chopped and sun-dried tomatoes x5, 125g of sliced ball mozzarella.

And to successfully make this pizza pie, our method below could be helpful to you:

  • Prepare a bowl and then prepare a pizza dough mix in it. Then cover with a clean towel and let it be exposed to the sun for about an hour or until it rises.
  • Then cut the dough into pieces and press hard each piece on a surface sprinkled with flour.
  • Then spread a round of the dough with tapenade or pesto in a pan and top it with tomatoes or mozzarella. Then cover that round of pizza with another dough and press them hard to seal them.
  • Put your frying pan on the camp stove and cook for about 15 minutes until a golden brown color is yielded
  • You can then cut your pizza into slices to serve after cooling it.

Frying pan pizza pie

Sweet potato pasta

You can probably consider this for your breakfast dining or during supper after a long day of backpacking or hiking. It is relatively easy to make this pasta as long as you have the following ingredients:

  • Chopped garlic cloves x2, 2 teaspoons of olive oil, finely chopped stick celery, chopped carrot, chopped brown onion, 400g diced tomatoes, 1.5 cups of small pasta, peeled and diced sweet potato or pumpkin, parsley and Parmesan, and 5 liters of hot water.

To successfully create this meal, follow our instructions below:

  • Preheat the oil on a camp stove
  • Then mix the onion, garlic, celery and carrot in the oil and stir until the onion is tender
  • Add sweet potatoes and tomatoes to the pot and pour water
  • Cover the pot and cook for about 30 minutes
  • Later add the pasta and leave the pot for additional 10 minutes on the stove
  • Remove the pot from the camp stove, and top the contents with parsley and Parmesan
  • Then serve your delicious meal

Sweet potato pasta

Cheesy scrambled egg croissants

This recipe is suitable to benefit your body with proteins in the morning before you head out to your hiking or backpacking activities. Even if you give the instructions to the 11 year old child, they can make a mouth watering dish for you.

As long as you have the following ingredients, you are sorted:

  • 4 large croissants, 8 large eggs, milk, 100g grated cheddar and snipped a small bunch of chives

The instructions to make this meal are as follows:

  • Prepare a large bowl in which you will whisk the eggs, milk and the grated cheddar. Add some seasoning to taste (salt or black pepper).
  • Prepare a saucepan on your camp stove to pour the mixture
  • Stir the contents in chives
  • Then split the croissants and pour the scrambled eggs.
  • Your meal should be ready to serve.

Cheesy scrambled egg croissants

English Breakfast

As the name says, this is the English breakfast to add fun and pleasure to your day in the dawn of your morning. Don’t be discouraged by the name, it’s actually effortless to make it. The following ingredients are your gateway:

  • 4 pork chipolata
  • 4 smoked back bacon
  • Snipped chives
  • Grated cheddar
  • 6 eggs
  • Halved tomatoes
  • And 140g of button mushroom

The method below will help you achieve your English Breakfast mission. It should take about 5 minutes to prepare and 15 minutes to complete the cooking process:

  • Preheat the camp stove to a high heat and put the frying pan on it
  • Fry the pork chipolatas in the pan for about 5 minutes
  • Then add bacon and fry each side until it is crisp
  • Add the mushrooms and cook for about 3 minutes
  • Remove excess fat from the pan before adding other ingredients
  • Add the seasoned eggs to the pan by spreading them over the contents
  • Add tomatoes, chives and the grated cheddar and continue cooking for 2 minutes
  • Once done, cut the meal into wedges to serve

English Breakfast

Chicken Noodle Soup

Perhaps you brought the bread or rice, having the chicken noodle soup could be the best companion for them. Imagine the pleasure of having this meal in the early morning amid the freezing temperatures. Have the following ingredients to prepare it:

  • Shredded BBQ chicken
  • 45g sachet of chicken noodle soup x2
  • ½ cup of chopped parsley
  • 85g packet of 2 minute noodles
  • 1kg mixed vegetables
  • 2 cloves of crushed garlic
  • 2 chopped onions

The method to make this delicious menu is as follows:

  • Prepare a large pot and your camp stove
  • Pour 4L of water into the pot
  • Then add all the ingredients excluding the optional parsley
  • Then let them boil for about 4 minutes
  • Then later add parsley
  • Stir occasionally until your meal is ready to serve

Chicken Noodle Soup

Mushroom & Potato Curry

Only 30 minutes of your time is needed to make this meal suitable for your lunch. Breakfast often needs quick things, so this better be suitable for lunch or dinner. Ten minutes needed to prepare and 20 min needed to cook. It can serve 4 people. The following ingredients are needed:

  • Large potato, 1 onion, teaspoon of olive or veg oil, trimmed aubergine, 250g button mushrooms, 3 teaspoons of curry paste, 400ml of coconut milk, chopped coriander and 150ml vegetable stock.

Then follow the instructions below to make your meal:

  • Prepare your camp stove and put a saucepan on it to pour olive or veg oil in it
  • Add the potato and the chopped onion
  • Cook for about 5 minutes while the saucepan is covered until the potato is soft
  • Add the Aubergine and the mushrooms and extend the cook time by 5 minutes
  • Add the curry paste and pour the coconut milk and the vegetable stock
  • Simmer the contents for about 10 minutes
  • Stir with the coriander
  • Then serve with bread or rice

Mushroom & Potato Curry

Chicken Pilaf

We reckon you prepare this appetizing meal at home ahead of time. All you need are the following ingredients:

  • 2 cloves of garlic, 2 teaspoons of olive oil, chopped onion x1, 2 teaspoons of curry powder, skinless and boneless chicken breasts, cut into chunks, 1.5 cups of cooked basmati rice, ¾ cup of chicken stock, chopped mixed vegetables, and salt & pepper.

The simple method is described to make this meal:

  • Prepare a frying pan and put it in the oven at home.
  • Then add onion, garlic and chicken and fry them
  • Stir in the cooked basmati rice and the curry
  • Then remove the mixture from the stove and store in a zip lock bag
  • When it’s time to prepare for lunch in the wilderness, add the mixture to the pot and cook on your camp stove
  • Bring to boil and cover the saucepan for 5 minutes
  • Then serve your meal

Chicken Pilaf

Spoon Bread

The spoon bread could be ideal for your breakfast enjoyment. Buy the following ingredients to prepare for it:

  • 1 cup of flour
  • 1 cup of cornmeal
  • 2 eggs
  • ¼ cup of sugar
  • 4 teaspoons of baking powder
  • ¼ cup of margarine or butter
  • 1 cup of milk

The instructions are highlighted below to make the spoon bread:

  • Mix the 4 ingredients and melt butter/margarine
  • Scramble eggs and add them with milk to the mixture
  • Pour the entire mixture into the pan and bake for about 20 minutes
  • Then serve

Spoon Bread

Wrapping It Up

This marks the end of our enticing, appetizing and delicious recipes suitable for your camp stove. Please note that these recipes can be similarly cooked on a campfire in case you run out of gas or propane in your camp stove. But you must be vigilant about the high heat provided by the camp fire. You can monitor that by reducing the woods. Camp fire can be damaging to your pots or saucepan.

That being said, we reckon that you apply the liquid soap on the outer surface before putting them on the campfire. This will make it easy to clean them thereafter.

picture of amazing camping food

Given these recipes, you must be well-equipped to make any meal of your choice. We’ve provided the ingredients and the methods to cook each meal. Also notable is the cooking techniques we’ve provided at the beginning. The important one is to prepare ahead of time.

DIY Backpacking Food: Your Homemade Outdoor Meal

0
close-up photo of a rice bowl on the table

The kind of food you carry for your backpacking trip matters a lot. Most hikers and campers find it difficult to decide what type of food to bring with them to their outdoor tours. As humans, they are prone to choosing the tastiest and most nourishing, but when it’s time to hit the track, things become messy.

To avoid these kinds of problems, it’s important to have an idea of how to create a DIY backpacking food, so it becomes easier to have meals within the shortest time possible. Most people make poor decisions as far as this issue of meals is concerned, and this significantly affects their adventurous events.

picture of a man watching the landscape

When you are planning your backpacking tour, you need to know that what you carry for a one-day trip could greatly differ with the food you would take to your backpacking tour. Various factors would play a part in the choice of food you select such as taste, weight, durability, and nutritional value. It may seem overwhelming to plan and prepare a homemade backpacking food, but once you have an idea of how to go about it, you won’t have to spend a lot of time looking for what is best for you.

METHODS FOR ULTRALIGHT BACKPACKING FOODS

  • If you want to minimize the weight of your food, use a dehydrator to get rid of moisture. Using an inexpensive equipment with stacking plastic will go a long way in removing water from your food.
  • Choose easy and comfort recipes such as stews, sauces, and casseroles which are thick and contain great flavors. Rice, noodles, sauces, mashed potatoes or polenta, and condiments you would serve with a dish may be obtained small packets to compliment your dish. Meals that depend on certain texture, structure or large pieces don’t adapt well to a dehydrator.
  • You do not need to spend so much time cooking yourself. Double your recipe for the favorite meal and place half of it in your dehydrator overnight or before heading to work in the morning and the food will be ready for the trail come the weekend. Alternatively, you can buy a pre-made meal from a deli at the local grocery, prepare it as per the instructions given on the package, and convert the food to a backpacking meal using these principles. Make sure that what you have is a recipe you would love to consume.
  • Pack your recipes along with nutritious and colorful veggies. However, limit the fiber as this is weight without calorie.
  • Make sure the flavors in your homemade backpacking food are varied as this will keep your meal interesting throughout the trip.
  • Once you have prepared your recipe in the kitchen, puree or chop the food to consistent sizes. The smaller the portions cut, the faster the pieces will rehydrate at the camp. At first, the chopped version may look somewhat strange, but the taste of the meal will be familiar and fabulous.
  • You should learn what products rehydrate faster and which ones take the time to rehydrate. It will be very frustrating having to wait thirty minutes for the meal to rehydrate so as the meal can soften when on the trail. Some grains, vegetables, tofu and beans often take some time to rehydrate. Therefore, you can replace these products with the freeze dried versions since these foods rehydrate faster.
  • Be careful with fatty meals as food that contains fatty surface go rancid quickly. Rinse the fat from the meat using hot water before you can rehydrate. Limit the amount of fat when cooking and carry butter or a bottle of olive oil to add at the camp.
  • The closer you are able to get the dehydrated sauces into powder consistency, the faster your homemade backpacking food will be ready when on the outdoors. Pulse the food in a blender or processor once the moisture has been extracted from it. You will notice that the coarser components won’t be easily broken but the sauce ones will.
  • Measure your food into servings before you can put it in a dehydrator. Add some volume of water so as to recreate the initial serving volume.
  • When placing the food in the dehydrator, spread it uniformly and thinly over the trays. For runny sauces and drier recipes, use a fruit leather tray and a mesh tray respectively. Food dries quickly when placed on mesh trays.
  • Do not compromise the drying time. Food can never get over-dried, so make sure you do it overnight or even longer.
  • At the camp, use hot water or create a lightweight insulated ‘cozy’ for nestling the pot. The hotter the food products remain during re-hydration, the quicker it’ll be ready for consumption.

Weston Stainless Steel Food Dehydrator

CHOOSING YOUR HOMEMADE BACKPACKING FOOD

The time has come for you to take a chance into the unknown and begin preparing your own camping meals. By using certain ingredients and cups of boiling water, you’ll be in a position to create an actual meal in the wilderness with as many calories as you desire. Here’s how to go about it.

The Base

Let’s begin with the carbohydrates. Select one which is not fussy and pack light. Basically, the carbohydrate will be over a hundred calories per ounce and will be able to rehydrate without having to boil water for over a minute so you can save on fuel. Here are some examples:

  • Rice noodles – This choice is perfect when you are in need of texture
  • Couscous – This is a favorite way to begin a backpacking meal. During a hot period, couscous cooks by adding cold water and leaving it out in the sun covered for about a half an hour.
  • Potato flakes – The Idahoan potatoes are a perfect staple for the backcountry meals. Begin with the plain flakes and add your flavoring.
  • Macaroni – Pasta shapes which are small and thin will cook excellently by adding boiling water and covering for about ten minutes with the heat turned off.
  • Instant rice – While it’s possible to rehydrate instant rice using cold water, heating up the water to a simmer would yield much better results.

Picture of and Adult Eating Campfire Couscous Salad

The Flavor

After that, you’ll need to consider how to season the base. This can be done with:

  • Spices – Make sure you take a look at your spice cabinet. Some dried mustard perquisites your couscous. You can add dried basil to pasta. Chipotle can be used to add flavor to your instant rice. You should try a few experiments to determine what is suitable for your case.
  • Seasoning mixes – Seasoning packets often come in different flavors including chow mein, fried rice, and chili. The Asian grocery store would be the most ideal place to look for these products. Here, you can find great backpacking meal additions such as instant chicken and powdered coconut milk.
  • Curry paste – You can add this product to your instant rice during your back country ventures, but you’ll need to gauge your comfort level as this may not be suitable for your case.

Dried basil lasts much longer than fresh.

The Nutrition

Adding nutrition to your back country meal is probably the hardest thing you can do. Vegetables can be heavy, so you’ll need to think carefully and choose products that have a moisture weight reduced. Aim for fifty calories per ounce, which include staples such as dried onion and dried tomatoes, which can be found in any grocery shop. Trader Joe’s is an excellent source of dried veggies, including dried beans, dried coconut, and dried kales.

Ovena Dehydrate Kale Chips

If you are more than willing to splurge, there are online companies which sell backpacker-friendly vegetables from dehydrated sweet potatoes to freeze-dried spinach.

The Calories

When selecting fat for your backpacking meals, you can never go wrong when it comes to calories. Most fats are upwards a hundred and sixty calories per ounce, so do not hesitate when searching for your hearty meal. You can opt for olive oil, which is easy to carry in a lightweight disposable bottle.

However, there are other options to pick including avocado oil, peanut oil, safflower oil, among others. Remember to keep the oil separate until the food has cooked since water and oil do not mix.

avocado oil near to avocado on the table

At this point, some splurging can create a huge difference. Powdered butter can boost your back country meal made with potato flakes. Cheddar cheese and powdered Parmesan can make your pasta worthy of a back country.

The Protein

If you have been snacking on beef jerky, almonds, and peanut butter throughout the day, it may not be necessary to include proteins into the end-of-day meal. Nonetheless, if you are thinking of incorporating it into your recipe, there are some options you can consider. At the grocery shop, you can find dehydrated refried beans and bacon bits. If you are brave enough, you can opt for a freeze-dried ground beef.

Chop up the bacon and add to the meat mix.

There are numerous ways of combining the above ingredients to create an easy, fast, and delicious meal. Make sure you do some experiments at home before heading to the back country. That way, you’ll have an idea of how best to prepare your homemade backpacking food without difficulties.

BACKPACKING SNACKS TO CONSIDER

You are on the trail, and you get hit by the snack attack. Now you know you need something fast to quench that desire. Snacks are great to have every time you are in the back country. It is important to prepare some at home before leaving for the back country. Here’s what you’ll need to consider.

  • Fig bars are tasty and affordable. You can also decide to buy something like ProBar Mel and ClifBar Orginal. If you are an experienced backpacker, you may need to consider purchasing a dehydrator to make fruit rolls, dried veggies, and fruits. Salami, dried fruits, cheese, and fruit leather – whatever you prefer, make sure there’s a perfect mix of salty and sweet.
  • Homemade Granola Bars are snacks you can easily make at home. Pack this product in reusable zip lock and snack time baggies. You can include carob chips, chocolate, almonds, pistachios, pumpkin seeds, walnuts, cashews, coconut butter, dried fruit, or any other thing that would be ideal for hiking.
  • You can never go wrong with fresh fruit. Make sure to stock up on fresh fruits such as bananas, grapes, apples, and oranges beforehand. The juice from these fruits will be tantalizing during and after a long hike.
  • The Raspberry Fig Fruit Leather recipe is easy to make, and the outcome is so delicious. This is a perfect snack when hiking or when hanging around the campsite.

dark-chocolate-cherry-almond-granola-bars-above-w-name

WHAT ARE THE BENEFITS OF PREPARING BACKPACKING FOOD?

If you will be spending a tremendous amount of time in the outdoors, it is beneficial and cost-effective to prepare your back country meals as highlighted above. Nonetheless, if you plan is to go on a short-period hike, you may want to bring a pre-cooked meal or prefer eating out. Preparing a homemade backpacking food is preferable as opposed to camp cooking. Here is why:

  • If you happen to forget your fuel canister, hose, or any other critical component, it will be impossible to have a meal, and this ruins your entire experience
  • Cleaning dishes after cooking and eating can be time-consuming and overwhelming
  • If you are purchasing kitchen equipment for camping for a few trips, cooking at the campsite is definitely not a cost-effective measure
  • If you have no experience in camp cooking, the outcome of your meal will vary greatly

So what are the alternatives?

  • Prepare a homemade backpacking meal and take with you on your outdoor trip
  • Carry the just-add-water product (dehydrated meals). These may include items such as dried beans, oatmeal, coffee, tea, and cream cheese. You can also carry pre-made sandwiches for lunch, and other pre-made food for dinner. For instance, if you pre-cook steak or chicken, you can prepare burritos by reheating everything.

picture of cream cheese on the top of a bread slice

BEST BACKPACKING MEALS FOR YOUR OUTDOOR SURVIVAL

Marinated tofu

It usually takes some time to make the tofu before you can hit the trail, but you will fall in love with its taste. Here is how to go about the process: cut the tofu into small blocks for quick and easy marination. One block of tofu should create about eight smaller blocks.

After that, put the block on a towel or a heavy fabric and cover the tofu with it. Put something heavy on the blocks of tofu, so the water and juice content is extracted. It will not be perfect, but it would be ideal that way. Drain the water.

In the meantime, place the following ingredients in a bowl for the marinade:

  • Two teaspoons of olive oil
  • Lime juice
  • A half chopped jalapeno
  • A quarter onion (chopped into smaller cubes)
  • A half teaspoon each of salt and pepper
  • One tablespoon tequila (optional)

Mix the ingredients well to create a homogenous mixture. Now, place the blocks of tofu in the marinade.

When you are in a hurry and making this food right before you can start your trip, give it about fifteen minutes to soak. However, for the best outcome, leave the mixture for fifteen minutes before transferring it to a freezer until the day you are to begin your trip.

The good thing about tofu is that it can unfreeze relatively quicker compared to meat. Once the food is unfrozen, you can prepare it whoever way you find suitable. You can cook it in oil or eat it as it is with some fresh veggies.

Marinated tofu on the plate

Granola bars

If you are a person who loves granola bars and nuts, you can be delighted that there are better ways of making these food products without the weird preservatives and additives. If you’re are a conscious individual, then this recipe will work for you.

Prepare the following:

  • A quarter tablespoon sea salt
  • One and a half cups of rolled oats and same amount of crispy rice cereal
  • A third of a cup of dried blueberries
  • A half cup of shredded coconut
  • A quarter nut butter (almond is suitable)
  • A half syrup (can, brown rice, maple, etc.)
  • A half cup of chopped almond
  • A half a teaspoon of vanilla extract or one teaspoon vanilla sugar

Begin by turning your oven to preheat to three-hundred and fifty degrees Fahrenheit. After that, put on the baking sheet shredded coconut and almond bits to bake until brown areas are formed.

After that, prepare a baking pan and line the pan with two overlapping baking sheets such that all the sides and bottom of the pan are covered. Mix the rolled oats, rice cereals, blueberries, salts, almond, and coconut in a bowl. These need to be uniformly mixed. They will later be put in a baking pan.

In the pan or skillet, place butter and a syrup of your choice. Cook the mixture, so they blend perfectly to create a homogenous mixture. Signs of bubbles indicate your mixture is ready. Add the vanilla extract and stir everything. Remove the pan/skillet from the heat source and give it time to cool slightly.

From here, go back to your oats mixture. Add butter mixture and syrup to the rice cereals and oats and stir well to allow the butter and syrup to dissolve. Pour the mixture into a baking pan and press it with slightly wet hands to make the mixture hard and tight. Ensure the surface is uniform without strange protrusions. When that is done, place the component in a freezer for about fifteen minutes.

After that, take the pan out of the freezer. Using a baking sheet, remove the mixture block and put it on a table. Cut the component into twelve or fewer bars. When you want to store them, it’s advisable to wrap the bars individually in their own wrap. Store the products in a fridge to ensure they do not perish easily. Only remove them from the refrigerator when it’s time to go camping or hiking.

Close up of Granola Bar

Trout taco recipe

If you are a person who loves to fish when hiking or camping, then this recipe is meant for you. You can prepare trout taco by either bringing an already caught fish or catching one on your own. To make this meal, here’s what you’ll need:

  • Lemon drops
  • Olive oil (to taste)
  • Trout (a single fish yield a portion)
  • A teaspoon of rosemary, pepper, and oregano
  • A corn tortilla
  • A teaspoon salt
  • Sauce

Prepare your fish by ensuring it’s clean. After you have removed its insides, season the fish using a mixture of pepper, lemon, oregano, and rosemary, plus salt. Cover it using olive oil. This can be smeared mostly on the skin area. Add some oil to the skillet to preheat it before you can fry your fish. Fry the fish until it turns brown.

There are other alternatives to the skillet. In case you don’t have it, you can opt for a heavy-duty foil. Wrap your fish in the foil and then place on the charcoal base fire. Alternatively, you insert a stick and put your fish above the flames. However, you need to be carefully so as not to over burn the fish or it may end up turning black and inedible.

Finally, after the fish is cooked and ready, remove the meat from its skeleton and put these pieces on the tortilla wrap. Roll the fish inside the wrap, and you have yourself a homemade backpacking food. You can decide to add other components to your tacos such as ketchup or any other sauce. You can try a Carrot Cayenne Sauce or guacamole.

Jerk Spiced Organic Trout Tacos with Honeydew Salsa

Homemade Trail Mix: A Healthy, Tasty Treat!

0
picture of nuts trail mix

Homemade trail mix is a delicious treat that not only tastes great but can be healthy as well! We all love trail mix, but making it yourself ensures you can make it healthier and add the things you like to eat. Whether you are home, or at the gym, or out on the hiking trail, having some trail mix that you made by your side will boost your energy and give you some necessary vitamins and minerals that your body needs!

Some people tend to stay away from trail mix because it contains many sugars and fats, but if they are healthy sugars and fats, then it is okay in moderation. If you purchase trail mix at the store, you are going to get higher sugar and fat contents that if you would have made it yourself, where you can ensure the ingredients you are getting are raw, without sugar, and not coated with anything that makes it unhealthier.

The modern day trail mix we all know came about in 1968, in California, by two people who loved to surf. They took peanuts and raisins and mixed them together to get a boost of energy. From there, the idea took off and now we have more items in trail mix to enjoy! The first origins of trail mix were noted in the 17th century, in Europe. Fun fact: National Trail Mix Day is August 31st!

Brown Peanuts on Silver Steel Tray

Now, let us dive right into the world of homemade trail mix, as we show you features of the food, how to make your own, and give you some opinions about it! Then, you can make your own version of this delicious creation!

Things to Consider Before Making the Mix

When it comes to making your own trail mix, there are a few things to consider before you mix together just any of the necessary foods.

Choices

You have the choice on what you want to put in your trail mix. You can choose your favorite nuts to include such as almonds, pecans, and cashews, for example. What are your favorite fruits? Find the dried version such as bananas and apricot to add to the mix. You can add any type of seeds like pumpkin or sunflower. When it comes to the sweet treats, you can add in the popular chocolate, or even pretzels and popcorn. It’s your world!

photo of fruits and nuts trail-mix

Health Factor

Believe it or not, the foods that make up trail mix, especially if they are raw, can promote a healthy body in various ways. You are getting dozens of vitamins, minerals and good things your body needs. Sure, you get fats and sugars, but when making your own trail mix, you can make it less fatty and sugary. This tasty snack also lowers your cholesterol and is heart healthy! Plus, it makes for a great energy boost when out on the hiking trail!

Healthy trail-mix of fruits and peanuts

Store Bought

If you are buying trail mix right from the store, chances are good that you are getting a more fatty and sugary version of the snack, than you would if you made your own. The store bought version is often not made with raw nuts and seeds, either. Making your own allows you to buy the healthiest versions of such things.

Ultimate Trail Mix Packaged

Perfect Snack

Trail mix is quite possibly a perfect snack, as it includes everything you would want; something sweet, salty, fruity and nutty. Eating trail mix gives you an energy boost, so it’s great for campers, hikers, and at the gym! It can be taken anywhere and stored in any container easily for your enjoyment later. Plus, it is packed with vitamins and minerals that your body needs! You cannot go wrong!

Trail Mix in Jar on the side

How to Make a Trail Mix

When making your own trail mix, there are 4 categories of things you need. These are the key ingredients in making trail mix. You can choose your own variety from these categories to make the ideal trail mix.

Ingredients What They Do For Your Body
 Nuts


(Examples: Macadamia, Pecan, Almond, Peanut, Cashew)

Using raw nuts is the best way to go, which means they are free of salt, oils, and coatings. Nuts give the body a ton of vitamins and minerals, and some even help lower your cholesterol. They have healthy fats and are good for your arteries.
 Seeds


(Examples: Pumpkin, Sunflower, Sesame, Chia)

A variety of seeds can be used here and they are great for your health as they contain protein, magnesium and iron. Using raw seeds, like nuts, is the healthiest way to go. Seeds also are packed with minerals and vitamins that your body needs to keep going!
 Dried Fruit


(Examples: Bananas, Raisins, Apricots)

Dried fruit is perfect for raising low blood sugar after exercising. You will want to look for sun dried fruit that is not sugar coated or contains sulfur. Various fruits are good for your body to give you vitamins, minerals, and healthy brain function, among other health benefits.
 Sweets & Treats


(Examples: Popcorn, Dark Chocolate, Pretzels, M&Ms)

While many sweets and treats are not good for you, it is important to have some sugar or something tasty as part of the trail mix. Some treats have a little nutritional value, like dark chocolate. Occasional sweets are fine as long as you do not indulge all of the time.

When it comes to nuts, eating them raw, instead of roasted is the healthier option because it is the most natural way. If your nuts are roasted, they contain less of a healthy punch to your snack. Eating them raw gives you all the nutrients from them. For example, when adding nuts to your mix, by not roasting them, you are getting all of the fiber, iron, calcium, vitamin E, protein and more from them. If your nuts are made with salt, starch, sugar or any preservatives, they are then made less healthy.

That is how you get all of the added sugar and bad things. The preservatives are made to keep the food ready to eat, but by using it, they are using most unhealthy means. This is the same for seeds, as well. You can make your own dried fruit, which would be the healthier option. This way, it is also not coated in sugar and preservatives that make your snack less healthy. By drying fruit all natural, your snack will be that much healthier with less fat, sugar and more of the vitamins and minerals you need.

Cheerios Trail Mix Printer Friendly Recipe

When it comes to adding your sweets and treats to the trail mix, consider the healthier options. Dark chocolate is good for the heart and body versus regular chocolate, so that can be added in. There is healthy popcorn on the market, you can pop and mix in, too. If you want to use pretzels, you can find unsalted ones to mix in. Consider your options and how healthy you want your mix to be when it comes to adding foods from this category.

Making Dried Fruit

If you want to make your own dried fruit, your snack will definitely be healthier! Here is what you do.

  • Choose your fruits. You can choose 2 or 3 fruits to add to your trail mix.
  • Wash your fruit and remove any blemishes on it.
  • Remove any stones, stems, or pits from your fruits.
  • Cut your fruits in an even manner so they can all evenly dry. You can choose to remove the skins here if you wish.
  • Soak your fruits in lemon juice and water for 10 minutes and drain.
  • Preheat your oven to about 150 degrees F and arrange your fruit on a sheet pan so that they do not touch.
  • Place the pan in the oven and rotate it every 2 hours until done. (See chart below)
  • Cure the fruits by putting them in a container that is open for about 5 days so it can dry up. Seal the container after 5 days and store them for up to 10 months.

Some fruits need to cook longer than others. See the chart below to give you a general idea of cook times for some popular fruits.

Fruits Cook Times at 150 Degrees Fahrenheit
Pears 6 hours
Peaches 6 hours
Bananas 6 hours
Apples 6 hours
Cherries 12 hours
Strawberries 12 hours
Apricots 12 hour

Best Recipes for Trail Mix

Recipe for Healthy Raw Trail Mix

Below is a general recipe for making your own trail mix with raw nuts and seeds, as well as unsweetened and non sulfur dried fruits. You can change your own nuts, seeds, and fruits as you see fit. You can sweeten it with a couple of tablespoons of syrup if you need more sweetness. Or if you do not, you can leave that out as well as cinnamon if you like.

  • (2 or 3) 3/4 cups of raw nuts of your choosing (cashews, pecans)
  • (2) 1/2 cups of raw seeds of your choosing (pumpkin, sunflower)
  • (2 or 3) 1/2 cup of unsweetened dried fruits (raisins, bananas, apples)
  • 1/2 cup of dark chocolate (and you can mix in pretzels or popcorn as well)
  • 1/4 teaspoon of sea salt
  • 1/2 teaspoon of cinnamon (if you desire)
  • Small pinch of nutmeg or cayenne pepper for spice

Take the ingredients and mix them all in a large bowl, very well. Use storage bags or plastic ware to store all of your trail mix. It should stay good enough to eat for about a month!

Recipe for Healthy Raw Trail Mix

Recipe for Sweet and Salty Trail Mix

  • 1 Cup of Raw Almonds
  • 1 Cup of Cashews, Unsalted
  • 1 Cup of Dried Fruit
  • 1 Cup of Oyster Crackers
  • 3/4 Cup of Dried Raisins or Cranberries
  • 1/3 Cup of Dark Chocolate bits or chips

Mix everything together in a bowl and store in a container. This mix stays good for about 3 to 4 weeks.

Recipe for Sweet and Salty Trail Mix

Recipe for Mountain Trail Mix

This is the classic recipe that most of us know and love. However, if you are gong for the healthiest option, this one is not it.

  • 1/2 Cup of Cashews
  • 1/4 Cup of Peanuts
  • Optional: 1/4 Cup of Almonds
  • 1/2 Cup of Raisins
  • 1 Full Package of M&Ms or chocolate bits

Mix all of the ingredients together in a bowl and stir. Store in a container. This mix is good for about a month.

Superfood Packed Trail Mix.

Recipe for Crunchy Trail Mix (Chocolate Free)

  • 1/2 Cup of Raisins or Cherries
  • 2 Cups of Rice Chex
  • 1/2 Cup of Pistachios
  • 3 Cups of Crunchy Cereal (Kashi, Corn Flakes)

Mix the foods together in a large bowl and stir. You can store these in plastic containers or jars for upwards of a month.

Crunchy Trail Mix Bars

Facts About Trail Mix

Below are some facts about trail mix that can be informative, and good to keep in mind. Some of these are just fun facts.

  • Many people wonder if they can eat trail mix while they are dieting. The truth is that trail mix contains a lot of calories that you do not want when you are on a diet. Trail mix can be a healthy snack, but not for someone who needs to watch their caloric intake.
  • Trail mix was eaten by Native Americans, who originally added buffalo meat to the mix. They could have made cured buffalo meat to make the mix tastier.
  • Did you know trail mix has a nickname? In short, it is called GORP, which stands for Good Old Raisins and Peanuts. It is also called Granola, Oats, Raisins and Peanuts.
  • In New Zealand, trail mix is called Scroggin.
  • Trail mix was created by nomadic people who would have to dry fruit and meat because they never stayed in one place. They would have to take it with them as they were traveling, so that is the first basic trail mix that we know of. Today, trail mix does not contain meat, unless someone wants to add some to it as they make their own.
  • Trail mix is known to be made of nuts, seeds, dried fruit, and some kind of treat. However, many people add cereal to the mix, popcorn, and any other non traditional item that they can think of. Many times, people use M&Ms, but others like to be a little more creative.

What Do Others Think of Trail Mix?

Many people think that trail mix is bad for you because it is high in fat and sugar. However, your body needs fats and sugars in order to work properly. The quality of the fat and sugar that is going into our body is important. But some people tend to shy away. And sure, some trail mix is more unhealthy than others. But you can make your own healthier version of the treat you love, without the guilt!

Mixed nuts and raisins in glass on wood

The majority of us love trail mix, not only for the healthy parts, but because its a fun way to snack and it is easy to take on the go, especially when backpacking or hiking! It contains many things you look for in a snack, something sweet, something salty, and something nutty. You really can not go wrong!

Pros and Cons

As with many foods and snacks, there are good things, and there are the not so good things. Below, we will give you the good and the bad on trail mix.

Pros:

  • Making your own trail mix allows you to make it with foods you love.
  • You can make your own dried fruit and add raw nuts and seeds to make it healthier.
  • It is a perfect snack to take on the go, and when you are camping, hiking, or exercising.
  • It offers a great energy boost.
  • It is easy to store in your backpack, as you can take along as much as you like.
  • It offers many flavors that will satisfy your palette.

Cons:

  • Store bought versions are higher in fats, sugars, coatings and preservatives.
  • Used foods made with preservatives make the snack unhealthy.
  • Making your own dried fruit can take a while.
  • Buying healthier fruits, nuts, and seeds is more expensive.
  • Can get messy if you are not careful eating it.

Concluding Thoughts

Making your own trail mix ensures you not only make it how you like it, but is healthy for you! Many hikers, backpackers, campers, and active people love trail mix to boost their energy and satisfy their sweet tooth.

If prepared right, you can make your own healthy version of trail mix that does not have as much sugar and contains fruits, nuts and seeds that you enjoy. The best thing about trail mix is that it can be eaten anywhere. Now that you know how to make your own trail mix, in a healthy way, you can take it along on your next hiking adventure!

small bags of homemade trail mix

Camping Breakfast Ideas: Wake Up Your Senses

0
Dish Cooking on Black Non Stick Pan on a BurnerCamping is a fun activity that requires adjusting every aspect of your daily life. However, it is good to live in an improvised accommodation when it means being close to the nature. It allows you to relax your mind and spirit and enjoy your stay with what nature has to offer.

Now, once we have successfully set up the campsite and looked around, it is next to gather around the fire and make something delicious to eat. That said, we are here to provide some excellent camping breakfast ideas, so that you can relax in the morning and have everything figured out. And the most important thing is that the suggested camping breakfast recipes are as easy to make as they are delicious to eat.

Brown Bread on the Table

Making food in nature often required a lot of improvisation and it helps if you have knowledge about the plants and herbs disposable at walking distance. Herbs that you can find in nature are a great way to spice up those meals and make them as tasty as a professional chef’s meal. It is interesting to mention that in our suggested camping breakfast recipes we have included drinks and practical advices that will boost your immune system and make you feel incredible.

Campfire Bacon from Zestuous

There are around 300 000 kinds of herbs and flowers and more than half of them are edible. The kinds and quantities that you can find on a camping trip vary tremendously. There are some areas that are like a dessert, poor with edible plants and other camping surroundings that are so rich with natural products that you could live off the land for weeks.

However, since we are used to our commodities, it is not a bad idea that you take all the ingredients from the list with you and if you happen to find something of the ingredients in the nature, simply include it in greater percentage in the meal!

It is important to mention that wild plants are more vitamin-rich than cultivated ones. When you are walking around your campsite, keep in mind that plants that are older, therefore larger and cellulose richer, which means they are also bitterer. For this reason, we advise you to pick young plants only. And we all know that food is more delicious when it is prepared outside in the nature.

beautiful landscape in the daylight

Regardless of whether you are on a short picnic or on a week long camping trip, this is the time to relax and refill your batteries. Nevertheless, good food is not something that happens on itself. It takes a lot of preparation and planning in order to cook nice and tasty meals that will take your breath away. Without further a due, here are some interesting camping breakfast ideas that have everything they need in order to make your camping trip out of the ordinary experience!

Egg & Spinach Breakfast Burritos

Old fashioned Mediterranean breakfast

If you are an admirer of traditions and habits you will know to appreciate this breakfast that reminds a lot to the well known ham and eggs. However, it is a bit spiced up and adjusted for our camping needs. Nevertheless, we guarantee that you will enjoy it and make plans to make it more than once on your trip.

Ingredients you are going to need: eggs, ham/bacon/ sausages (you should choose from the meat ingredient suggestions, or if you are a meat lover, go ahead and add them all to your breakfast package.), cheese, peppers, onion, parsley salt and pepper.

Important notes: Regardless of your meat choice, the meat should always be placed on the bottom since it takes a bit more time to cook than other ingredients. Similar to this, cheese should be placed on the top or it can also be added afterwards.

Cooking directions: For cooking this breakfast you are going to need a campfire, or to be more precise, embers of coal. If you are not willing to wait for embers of coal you can also use fire for cooking. However, when you are using embers of coal for cooking any camping meal, it is tastier and healthier. Think of it as a slow cooking mode. Whichever way you decide is more comfortable for you, proceed by putting the ingredients on a cooking foil.

The eggs should be previously mixed up in order to for them to get a scrambled taste. Place the package on top of the coal and cook for 10 to 15 minutes. If you are cooking on fire you will need less time and on the barbeque around 20 minutes. It is okay to check them every once in a while and take them out once they are cooked to your taste.

If you decide to put the cheese last, after shredding it over the meal, wrap the cooking foil and leave it on for a few minutes. The cheese will melt from the heat of the heated ingredients and there is no need of placing it over the fire once again.

Daily Mediterranean breakfast

Garlic bread with fresh wild tea leaves

Another perfect meal to begin your day with is garlic bread followed by a rich cup of natural tea. If you manage to find tea leaves around your camping area, this would be the perfect breakfast idea for you. You can even make a day out of it and teach your kids how to pick tea leaves. Tea made from fresh wild leaves has a richer aroma and much better taste.

Garlic bread is also an interesting breakfast idea for welcoming a lot of fellow campers when you don’t feel like cooking. It is a delicious option that will make everyone compliment your cooking and the lovely combination of aromas will reach the whole campsite.

Ingredients: When cooking this simple meal, the trick is to add as more spices as possible. This way, the meal will be full of flavor and the whole group will be full and satisfied. So, for cooking this meal you are going to need: bread, a combination of your favorite cheese types and some green spices (parsley, dill and a bit chili powder for waking up your senses and increasing the blood pressure a bit).

You will also need garlic, which is the main ingredient that could be added to your taste. If some of your group is not a big garlic fan, you can decrease the amount of garlic or leave part of the bread without this ingredient.

Instructions for cooking: Slice the bread in cubes and then place it on a cooking foil. Place the ingredients between the cubes and add some more cheese on the top of the bread. After that, decorate it with chili on top of the cheese.

Instructions for making the tea: Pick leaves from your favorite herb or flower that could be found around your campsite area. Wash them and place them on a towel overnight. The towel should not be placed directly on sunlight since they are going to lose some of the essential oils that they have inside them.

In the morning, boil some water and leave it to sit for 15 minutes without the tea leaves. After this, add the tea leaves and leave them for 5 minutes. After this, your tea is ready for serving.

Garlic bread with fresh wild tea leaves

Egg bowl

The Egg bowl is a nice camping breakfast idea if you are a fan of the healthy cuisine. It is served in a potato bowl and if you manage to make it right, it could be the hit of the whole camping trip. It is easy to do and doesn’t require much time and energy. Since the base of this meal is potato, it is the perfect way to start a long day of hiking since it will give you a great amount of energy, not to mention it is delicious!

Ingredients: For making the egg bowl you will need to prepare yourself from home. You will need larger potatoes for the meal and if there are kids involved, some smaller potatoes for them. You will also need eggs, bacon, butter, Gouda or cheddar cheese, fresh parsley and optionally spice it up with some salt, pepper and dill.

Instructions for cooking: You will need to cook this breakfast in two phases; although they are both simple and they don’t need any supervision. Meaning you could prepare them, put them on the BBQ and go ahead and do your morning activities. Just make sure you check them from time to time. You could decide to bake the potato directly on the BBQ, but the second option makes the taste much more delicious and it requires less supervision.

The alternative includes an aluminum foil. Wrap the potatoes in aluminum foil. One potato in each aluminum foil piece. With each potato, throw in some bacon as well. After this place the potatoes directly on the coal embeds. Turn them around from time to time so that they don’t burn. After baking the potatoes, cut them in half and remove the inner part, enough so that there is space for the other ingredients that are to be placed inside. The hole that you made inside the potato should be covered with the following mixture.

In a bowl, mix the bacon, some cheese, 1 tablespoon of butter and spices to your taste. If you prefer spicy food, add some more parsley, otherwise, the dill is the better option for you. Put the mixture inside the potato and add 2 eggs in each potato at the end.

In normal conditions, this should be baked. However, since we are happy campers, we are going to use a different and definitely more delicious approach. Once there is no more fire, and there are only coal embeds, make a closed system by using aluminum foil. Close the potatoes from all sides, together with the hot coal and leave only one side slightly open so that there is enough oxygen so that they keep providing heat. Leave the potatoes like this for 30 minutes. When you come back, you will have the most delicious breakfast you have ever tasted in your life!

Another alternative if you don’t have aluminum foil or you prefer a simpler way of doing things is using a covered pot placed on the BBQ.

Egg bowl is a nice camping breakfast

Campfire snakes and sausages

This is the simplest recipe and it is definitely one that should be prepared with the whole family gathered around the campfire. It is the perfect excuse for morning conversation with your loved ones and it is the most ideal way of starting the day. The only equipment you need for this meal are sticks from the nature, as thin as you can find, fire and some ingredients.

The sticks for the “snakes” could be with any thickness you find. The ones for the sausages, however, should be with pointed edges. The best way to find such sticks is to make them with a small knife. It would take you only a few minutes and it is a fun activity to do.

Ingredients: Once you have prepared the sticks for the “snakes” and sausages, you will need a store bought dough, or if you prefer, you could prepare the dough by yourself before going camping. Although this is harder, some people prefer starting from scratch since it gives them greater control of the ingredients.

Regardless of the source, you will need dough in order to make the snakes. Place the dough on the stick, wrapped around like a snake and add soup seasoning on the bread and some chilly. After this, wait for the “snakes” to be done and voila!

The sausages, however, will take some more cooking time. For this reason, you should place them on the pointed sticks 5 minutes before the snakes if you want to eat them together. And we highly recommend that you eat these two suggestions together. It is the perfect combination of ingredients and a wonderful meal to start the day with!

Campfire snakes and sausages

French toast with melted chocolate and fruits

As the last recipe in our camping breakfast ideas, we have included a sweet breakfast that is a combination of food for the soul, the chocolate and some fuel for the body, healthy fruits of your choice. However, this recipe requires that you take several plates because serving the meal without them is practically impossible.

Ingredients: French toast is certainly different when prepared on a BBQ. However, everything prepared outside is tastier, so is this one. Place the bread on the BBQ and bake for a few minutes. After this melt some chocolate in a heatproof cup. If you want to add some protein this meal, s’mores are a nice addition to this delightful combination.

Instructions for cooking: This recipe should be prepared in layers. It requires that you prepare the French toast first, like previously described. After this, melt the s’mores a bit and place them on top of the toast. Next would be topping the whole thing with some melted chocolate that will make you want to eat everything immediately.

However, there is one more layer to wait for. Chop the fruits into small pieces and add them for decoration above. It is recommended that you choose fruits that are with sour taste such as berries because the whole combination is sweet and you will need something sour to balance the taste. Strawberries, sour cherries or cherries are some of the most popular combinations and they also look gorgeous as well.

Interesting note: If you would like to step this up to the next level and decorate it a little bit, cut the corners of the bread and make the French toast in a circular form. Arrange all the ingredients in the center so that they look like a pancake breakfast. It is always nice to expect one taste and get a different one. A breakfast surprise that wakes up your senses!

French toast with melted chocolate and fruits

Final thoughts on this topic

Camping is a great way to spend some family time away from the technology that we love to use so much. An extended weekend is the perfect idea for relaxing and bonding. Even though some of the family members may be opposed to this at the beginning, with the right planning, everything will fall back to place and you will have a weekend to remember.

However, that also requires some meal planning which is not an easy task. Luckily, now you have these camping breakfast recipes to start with that will make the whole process easier.

The suggested camping breakfast ideas are also group meals which makes the cooking a whole lot easier. It saves the cook time and it is the perfect way to feed every member of the family at one time. Pick your favorite recipe from the list and prepare yourself for an unforgettable weekend with tasty meals that will bring smiles to the faces of your fellow campers!

Picture of a Cooked Meat

If you have some other recipes you would like to share with us, we encourage you to do so in the comment section below. We are always happy to hear from our happy campers! Bon appétit everyone!

Dehydrated Food Recipes: Make Delicious Backpacking Food

0

Drying food, or more specifically, dehydrating, is one of the best ways to preserve it while planning a camping or hiking trip and it is lighter than canned options. Therefore,today, we’re bringing you lots of dehydrated food recipes, and while for most recipes you’ll need a dehydrator, we’ll provide options for those of you who don’t own one. Both ways will provide useful food to stock up a storage of meals, that you won’t need to cook while outside in the wilderness.

By following simple steps we will provide in this article, you will have prepped meals that can easily be restructured by adding a bit of hot water or simply heating it above the campfire or a rocket stove. Let’s start!

Raw Zucchini Chips

What you will need to dehydrate food

  • Dehydrator – There are various types and brands of Dehydrators out there on the market and you don’t need to be a chef or an expert to know which one to buy, just keep in mind that you choose a dehydrator that has a different temperature system in order to set the air heat based on the type of food you’re dehydrating.
  • Oven – Almost all food can be easily dehydrated in an over, just keep the temperature at minimum and open the oven door just enough to let the air flow (tip: use a ladle between the oven door and the oven, it will provide enough space for air to run smoothly in and out). Dehydrating food with oven will be faster than dehydrating with a dehydrator due to the higher temperature, but you can prevent food to “bake” if you keep the oven door open
  • Hook – Most of the herbs don’t need to be dehydrated, but simply hung on the hook and left to dry in the air
  • Mandolin or a knife – Mandolin is a great tool to cut veggies and fruit because it’s really important to cut food equally when it comes to size. If you don’t have a mandolin, you can use a sharp knife.

Picture of Excalibur dehydrator

How to dehydrate food using the oven

There are many methods that are really efficient when it comes to dehydrating vegetables, fruits and meat, and using the oven, is surely one of them and is the most preferred method for all beginners in dehydrating food and “old-fashioned” folks, who are still doing everything the old way.

Dehydrating Mushrooms in an Oven Dehydrating Mushrooms in an Oven

Dehydrating in an oven will safely dehydrate, all the food you want to protect from insects and dust. Although, buying an electric dehydrator is not a big investment and uses less power energy than the oven, we would suggest starting with the basics and experiment with dehydrating in a conventional oven.

How to do it:

  • Use a thermometer to test the temperature as the optimal temperature for drying food in a conventional oven is 120 to 140 F (any temperature above can cause food un-tasty and scorch)
  • Use a measuring tape to make sure your cooling racks and drying trays fit in your kitchen oven. Make sure that there is one and a half inch between the oven and racks and trays in order to ensure air circulation and at least three inches between the first tray and the top of the oven and two and a half inches between racks.
  • If planning to dehydrate food in an oven you need to do it the same day you harvested vegetables and fruits. Make sure you use only fresh produce.
  • Slices need to be cut evenly to the same size in order to dry thoroughly
  • Wash all freshly harvested food before dehydrating it
  • Jerky takes around 4 hrs to dehydrate
  • Vegetables take approx 8 hours to dehydrate
  • Fruit takes approx 4 – 5 hrs to dehydrate

Extra tips:

  • Preheat your oven to 150 F and then lower the temperature accordingly to the food you’re dehydrating.
  • Prop open the oven at least 4 inches so that the air can circulate properly
  • Always cover your trays and racks with baking paper, cheesecloth or net-nylon. This way you will more easily remove the dehydrated food
  • Rearrange racks and trays every 30 – 45 mins in order to keep food dehydration even on all sides
  • Examine dehydrated food carefully, especially when the time of the process is near the end
  • Use only the bottom (lower) element.
  • You can dehydrate four to six lbs of produce at one time

List of food you can dehydrate

  • Frozen vegetables – Green onions, onions, jalapeno, green beans, leek, lettuce, peas, onion, pumpkin, potatoes (all types), scallions, rhubarb, Swiss chard, spaghetti squash, all types of tomatoes, turnips
  • Fresh vegetables – Asparagus, Broccoli, Beets, Beans, Butternut Squash, Celery, Corn, Carrots, Chives, Cucumbers, Coleslaw, Eggplant, Edamame
  • Fruit – Apples (all types), banana, muskmelon, blueberries, citrus fruit, cherries, cranberries, kiwi, grapes, papaya, mango, pineapple, watermelon, strawberries, raspberries.
  • Meat – Chicken, fish, beef, biltong, all types of ground meat, lamb, pork, turkey, venison meat
  • Spices and Herbs – Lavender, ginger, rosemary, stevia, spearmint, all herbs that can be hung and left to dry naturally in the air
  • Other – Broth, cheese, eggs, bread crumbs, bean bark, gourds, kimchi, mushrooms, marshmallow, nuts, milk, rice, oatmeal, whole grains

Green Broccoli Vegetable on Brown Wooden Table

Beginners guide to dehydrating

Meat

While veggies re-hydrate well, it’s not the same for meat. You might experience somewhat “chewy” texture than you’re used to but we have to say that it is better to have at least something at your hand when out in the open than not having anything to eat, especially meat. You can experiment with longer re-hydrating time in order to get the meat that suits your taste, but here is some basic info on how to dehydrate meat to start with.

It is best to dehydrate previously cooked meat, cut into small pieces at 160 F and to use tender cuts. This way you’ll possibly get tender, not chewy meat. Choose meat with less fat as it is fat that makes the meat sour.

Dehydrated meat is great for use in soups and stews, slowly cooking on the campfire and it can last up to two to three weeks kept at room temperature.

long-dehydrate-beef-jerky

Fruit

It’s best to dehydrate food at the peak of the season because this way you will save money and the fruit is ready to harvest, although it is possible to dehydrate frozen fruit as well. Fruits are best dehydrated at the temperature between 125°F and 135°F in order to prevent fruit getting crusty or baked, so don’t risk by turning your food dehydrator on higher temperature to speed up the process, you will only ruin fresh fruits.

photo of dehydrated fruits on the table

Vegetables

Same as with fruits, dehydrating vegetables is best done when freshly harvested. Just wash them and dehydrate it right away. Dehydrating vegetables is a pretty easy process and pretty similar to the one that is used for dehydrating fruits.

Almost all veggies are best dehydrated at temperature between 125°F and 135°F. Avoid higher temperature as it can create the crust on your veggies and make them baked instead of dehydrated. The only vegetable that needs special attention is mushrooms. They can’t be washed as this will make them too wet and the best practice is to dehydrate them on two different dehydrating temperatures (see instructions in the recipes section below).

picture of sun-dried-tomatoes

Frozen Fruit and Vegetables

All you need to do with frozen fruit and vegetables is to place it on trays without any preparation. The only thing you can do is to throw it down on the table or a counter top just a few times before you open the bag. This way you will separate food that has been clumped during the freezing process. If you can’t get fruit to separate and still have clumps you can simply put them under cold water (just for a few seconds) and you’re good to go.

Close Up Picture of Frozen Vegetables

Some fruits and veggies such as fresh carrots, strawberries, bananas and apples require some lemon juice spraying because it will prevent bacteria to grow during drying and fruits from darkening. Lemon juice is considered completely acceptable natural replacement for ascorbic acid.

Interesting snack recipes

Banana Graham and Peanut Butter Crackers

Ingredients:

  • 3 sliced bananas
  • ½ cup of peanut butter (cream)
  • 1 cup of peanuts (grounded)
  • 2 ½ cup of Graham cracker crumbs
  • ½ tsp of cinnamon

Process:

  • Mash bananas in a large bowl and mix in a peanut butter cream
  • Add peanuts, Graham cracker crumbs and cinnamon and stir it until it’s blended well
  • For a dough ball.
  • Use a big piece of baking paper and shape the dough into a rectangle.
  • Enclose the paper firmly around the dough and leave it to cool down for four to six hours (you can leave it overnight too)
  • Use a toothed knife to slice the dough into four slices.
  • Place on dehydrator sheets and dry in for four to six hours at 145º (when firm, take them out of the dehydrator). They need to be soft just like cookies.
  • With this recipe, you will get approx. 50 crackers.

healthy snack made of Peanut Butter Banana Smudgies

Dehydrated Granola Bars

Ingredients:

  • 1 cup of almonds
  • 1 cup of dates
  • ½ cup of dehydrated grapes or raisins
  • 1 cup of mixed dried pumpkin and sunflower seeds
  • ½ unsweetened coconut (shredded)
  • 2 tbsp of sesame
  • 1 tbsp of cinnamon
  • 1 tbsp of vanilla sugar
  • ⅓ cup of flax seed
  • 2 tbsp of honey
  • 2 tbsp of tahini

Process:

  • Soak almonds and dates in water for 1 to 1 ½ hr (90 mins)
  • Drain water and mix almonds and dates with dehydrated grapes or raisins, coconut and pumpkin and sunflower seeds in a food processor (you can divide it into thirds to overpower the food processor)
  • Scrape the sides and continue mixing in a large bowl
  • Add sesame seeds, cinnamon, flax seeds, honey, tahini and vanilla sugar and stir well with a spatula or a spoon.
  • Form little balls (around 2 Oz sizes) and shape it into bars with a baking paper
  • Place them on dehydrator trays and dehydrate for about 2 hours at 135°F and then turn the dehydrator temperature down to 115°F and continue drying for ten to twelve hours.
  • These bars can be eaten raw too, just skip the dehydrating process and after the mixing, place the shaped bars in the fridge.

Homemade Cranberry-Pistachio Granola Bars in Weston Dehydrator

Pizza-Chini (Pizza Zucchini)

Ingredients:

  • Thinly sliced zucchinis (to replace the pizza dough)
  • 3 tsp of tomato paste (can also be prepared in a dehydrator)
  • 1 tsp of vinegar (apple cider)
  • 2 cups of water
  • 1 tbsp of onion powder (can be prepared in a dehydrator)
  • 1 tbsp of garlic powder (can be prepared in a dehydrator)
  • 1 tbsp of oregano (dried, can be dried on a hook)
  • 2 tsp of salt (you can add 3 if you like saltier meals)
  • 2 tsp of paprika

Process:

  • Use a large bowl and mix spices and tomato paste until the mixture is nice, add the water and stir again.
  • Coat squash and zucchini slices with the mixture you prepare (thoroughly) and leave it cool for a few hours in order to squash and zucchini intake all the flavors of the mixture and marinade.
  • Place zucchini and squash slices onto the dehydrator tray and coat them with the remaining mixture/paste.
  • Place trays into dehydrator and dry at 105 degrees for 10 hours

close up photo of delish-stuffed-zucchini-

Rosemary and Almond Crackers

Ingredients:

  • 1 cup of water
  • ½ cup of Chia seeds or (ground golden flax)
  • 3 cups of almonds
  • 2 tbsp of finely chopped rosemary
  • Fresh ground pepper
  • Salt

Process:

  • Soak almonds in water overnight, then rinse and drain
  • Stir chia seeds (or ground flax) in water and leave for 30 minutes
  • Process almonds in the food processor
  • Mix processed almonds with chia seeds (or flax), salt, pepper and rosemary
  • Spread it in a thin layer on a baking sheet and place another sheet at the top of the mixture.
  • Roll out the mixture by using a rolling pin and cut into rectangles.
  • Put in the food dehydrator for 45 minutes at 145 F temperature, then lower the heat to 115 F for approx 8 hours.

Rosemary Raisin Almond Pulp Crackers

Spicy Green Beans

Ingredients:

  • 1 tbsp of olive oil (extra virgin)
  • 1 lb green beans
  • ½ tsp of spicy mix (cayenne, black pepper and salt)

Process:

  • Boil water in a saucepan and add green beans
  • Blanch it for around three minutes
  • Remove the saucepan from the stove and put green beans under cold water in order to stop them from cooking (like you would do with pasta)
  • Dry green beans and spice them with a spicy mixture and extra virgin olive oil.
  • Place them on a tray and let it dehydrate at a temperature of 125 F
  • Store in baggies or jars

Bowl of Spicy Green Beans

Dehydrating chicken for camping trips

Ingredients:

  • 6 chicken breasts (large)
  • 3 tbsp of salt
  • 2 l of water
  • 4 tbsp of sugar
  • 2 cloves
  • 1 bay leave
  • ½ tsp of peppercorns

Process:

  • Marine chicken breasts at least 24 hours, choose seasoning and spices you like
  • Mix all the ingredients (except chicken) in a pot, stir it and boil until salt and sugar dissolves
  • Remove the pot and leave it cool
  • Once it has cooled off you can leave it in a fridge for 12 – 24 hours until completely cold before adding chicken breasts.
  • Smear chicken breasts with the mixture and leave it in a fridge for 12 hrs. The mixture needs to cover chicken breasts completely.
  • Pressure cook the chicken for about 12 mins until completely cooked.
  • Let the chicken breasts cool and then cut them into small and thin slices. The thinner you slice the meat the quicker it will dehydrate.
  • You can either dehydrate it in an oven or a food dehydrator. If dehydrating in an oven, don’t forget to leave the oven door opened a bit. The temperature of the oven should be 122 F max. If using a food dehydrator you can adjust the temperature a bit higher.
  • Dehydrate it for 8 to 12 hours. When the color of the meat is darkened and is easy to break it’s done.
  • Store it in a container (possibly airtight) in a cool and dark place.

Dehydrating chicken for camping trips

Woodsy snack – Mushrooms

Process:

  • If you don’t have freshly harvested mushrooms we suggest buying pre-sliced ones as this will save you some time with slicing and preps plus they are sliced almost evenly.
  • If you have fresh mushrooms, then use a damp cloth to gently wipe the dirt. This is all you need to do.
  • Slice them to ⅜ inches through the steam and arrange slices on trays. Make sure that they don’t overlap.
  • Turn the dehydrator to the low temperature around 90°F and dehydrate mushrooms at this temperature for about 2 to 3 hours
  • Then increase the temperature to 125°F until they are fully dried (around 10 hrs)
  • Spread out trays in order to get even drying

Dehydrating mushrooms for camping trips

What have we learned?

Dehydrating food for your hiking and camping trips is a great idea. If you never tried dehydrated food, then it’s the perfect time to jump right in and start dehydrating and trying new things. There are so many good ingredients and food that can be dehydrated that it’s almost insane. Hopefully, our recipes will encourage you to start trying new things and keep you full with a diversity of yummy meals on your adventures.

If you’re already a true dehydrating master please share your stories, tips and recipes with us. If you found out something that works better than something we suggested in our article, we would love to hear it too.

Close-up picture of dried fruits on the plate