
ESSENTIAL SKILLS
How to Clean a Camelbak: Keeping Your Water Bladder Clean and Safe to Use
Camelbak water bladder cleaning is necessary and should be done after every usage, whether you are utilizing the water bladder for camping, biking or hiking. If you fill the water bladder with some other drinks aside from water, it should be cleaned instantly after use so as to forestall the growth of microbes, discoloration or mold. Fruit juice left in a Camelbak water bladder can serve as an incubator for bacteria and mold and this is exactly why you need to know how to clean a Camelbak properly.
Freezing the empty water bladder between uses is ideal, but you need to be careful because water increases more when frozen. However, freezing forestalls the growth of bacteria if the water bladder is not totally dry before storing it. If any water residue remains in the mouth spout, it will definitely freeze and increase and expand the opening. This can prevent the spout from self-sealing. To avoid this, take off the spout before freezing the water bladder. Water residue left inside the tube could likewise bring about an extension when frozen. Make sure the tube is water-free before freezing.
Figuring out how to keep a Camelbak clean, is an essential approach to Camelbak hygiene. Just in case you don’t know what a Camelbak is, in this article we are going to show you what a Camelbak water bladder is, and show you the best techniques and methods, with specific guidelines on the cleaning process and storing of a water bladder.
What Is Camelbak Water Bladder?
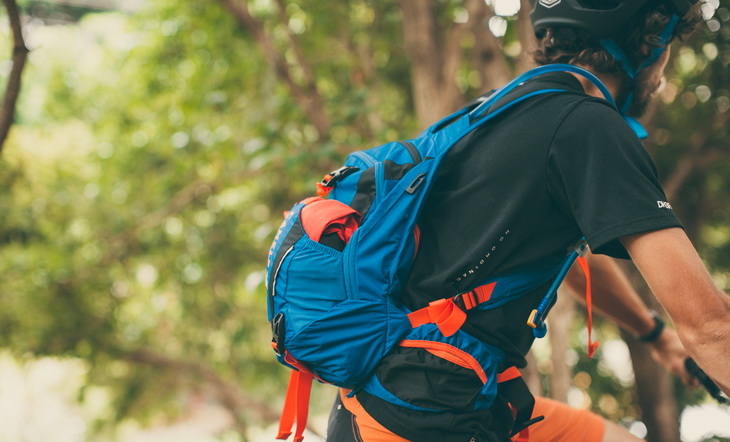
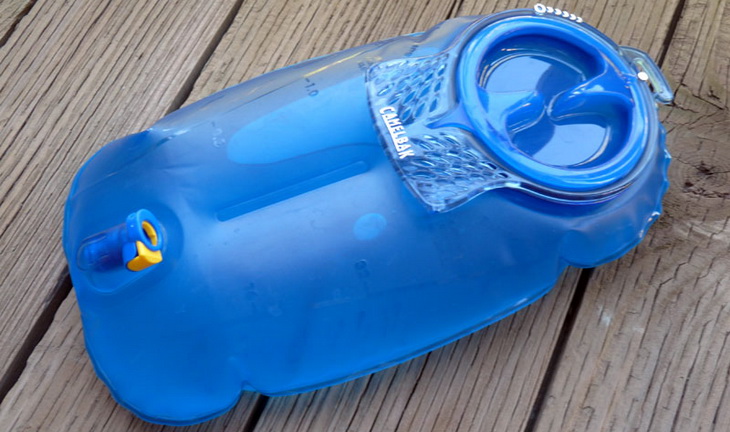
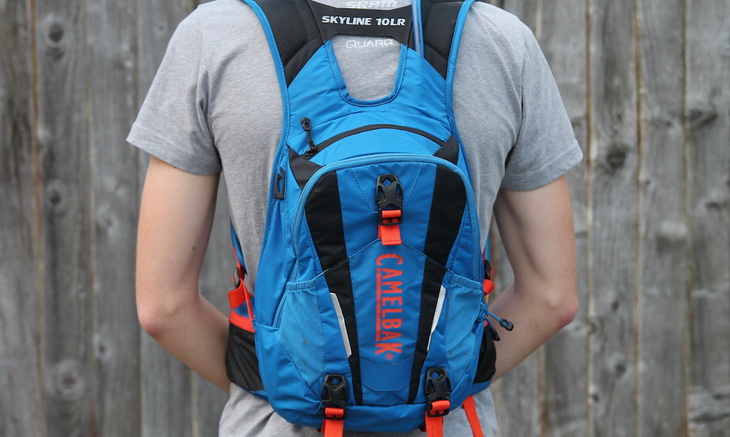
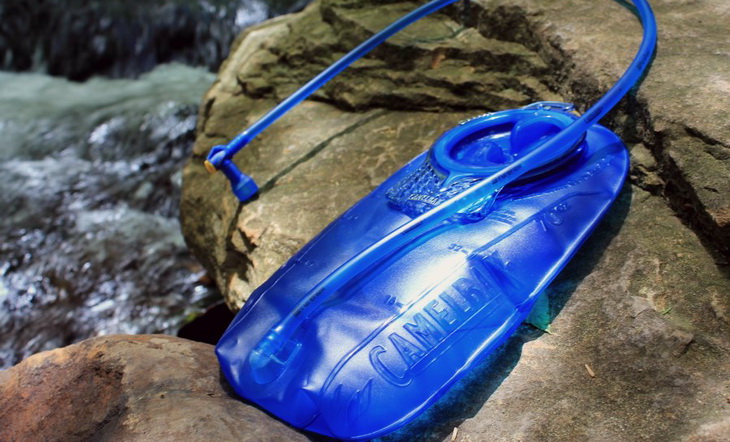
The Camelbak water bladder is a definitive piece of hydration gear, transforming any pack directly into a hydration bladder. The water bladder framework makes changing reservoirs easy. The Camelbak hydration bladder has a comfy low-profile fit. The hermetically sealed fill port, cuts bulk and weight in your pack, and the fast snap top enables you to fill the bladder with ease.
Remaining hydrated when hiking or camping, is absolutely important. If you turn out to be dehydrated, you are prone to falling sick or even causing harm to yourself. However, you can become dizzy, disorientated and end up getting worse or lost. Anyone who likes outdoor activities, knows how imperative this is, and will be accustomed to carrying water or other liquids with them. However, heat waves, losing your way on a hike, or just neglecting to take a drink, gets out the most experienced outdoors folks at times.
The simplest solution for keeping liquid available to you most of the times, is packing a Camelbak hydration bladder. Normally utilized by athletes, and now by backpackers and hikers. Water bladders concealed in your rucksack, make the liquid available through a tube, all the time. However, could there be anything more awful than slurping down bacteria and mold chunks from the water bladder that has been residing in the trunk for many weeks?
Most likely, but we would prefer not to take note of it. Such water bladders are quite convenient, however, they can be whimsical with regards to sanitation. Leave it sitting for quite a long time, seven days, or since last hiking trip, and the organisms that develop inside could definitely kill a vulture. At that point, what is needed is a thorough cleaning process.
Cleaning a Camelbak Hydration Bladder
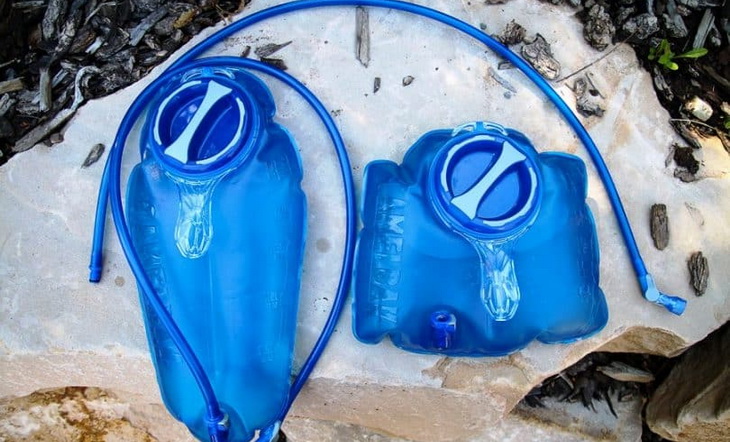
Camelbak is a trademarked brand that produces hydration bladders for hiking and climbing lovers. Every water bladder system is intended to enhance the hydration of hikers, with hands-free water capacity. A Camelbak hydration bladder has removable pack parts that require consistent cleaning: the water bladder, mouth piece and plastic hydration tube, and a sturdy textile pack. Intensive cleaning of every component will ensure a comfortable and healthy trip in the outdoors.
Ideally, water bladders would be drained, washed and air-dried, each time you utilize them. Nowadays, packs are removed and hurled in the storage room or secondary lounge of your car, until the next trip, which means it is already stuffed with a large portion of a packet of chews, and some drink the next time you held onto it. Definitely! While that may seem like an efficient win, it actually isn’t. Friends don’t give friends slimy water to drink—the stale chews are pretty much up to you.
Those stale chunks in your water bladder? They shouldn’t be there. However, they happen to be. So do mildews, mold and funky flavors—particularly if you include electrolytes or some other sort of drinks to your water bladder. Through consistent usage, your hydration bladder will amass debris and get to be dirty. The amassing of this debris can bring about mold and can result in sickness. These guidelines will guide you through the straightforward process of cleaning your hydration bladder in less than 10 minutes. Listed below are the materials required for cleaning:
- Bleach
- Measuring Cup
- One-Eighth Teaspoon
Eight Steps to Follow
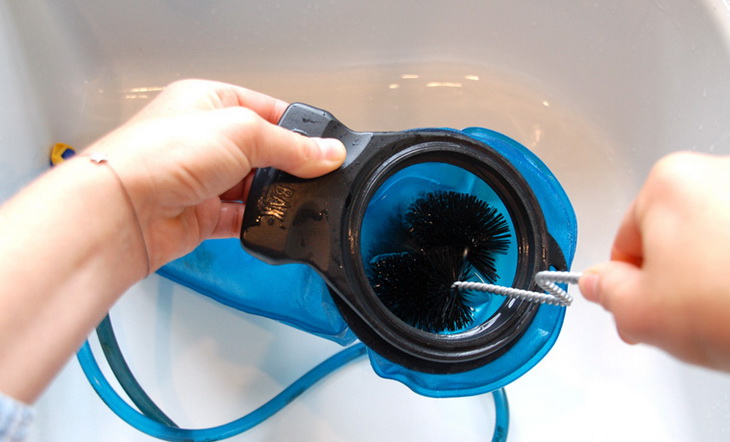
- Step one: Remove the bladder from the Camelbak pack. Rinse with water, both the inside and outside of the bladder with a small drop of fluid dish cleanser and warm water. Don’t use hot water. Utilize a froth paint brush or infant bottle to gently wash the inside of the water bladder.
- Step two: Wash the bladder with spotless, warm water and do the washing process again. Flush the bladder with water after every cleaning. After numerous cleanings, the water will definitely clear out the soap throughout the entire water bladder.
- Step three: Leave the opened water bladder out to air dry. Make sure the bladder is totally dry before putting it back into the Camelbak, keeping or utilizing out on the hike.
- Step four: Aerate and disinfect Camelbak water bladder all the time. Douse the unlocked water bladder overnight in warm water with two tablespoons of bleach. The following day, gently scours, wash and flush out the bladder until it is completely spotless. Leave the unscrewed bladder to totally dry.
- Step five: Stretch out the hydration tube for cleaning. Utilize a little measure of dish cleanser blended with moderate water and flush out the tube. Utilize a universally handy pipe cleaner or sponge to gently scour the inside of the water tube. Be mindful so as not to penetrate the fragile plastic tube.
- Step six: Flush out the water tube with spotless, cold water. For thorough cleaning, drench the hydration tube throughout the night with two teaspoons of bleach and warm water. Completely flush the tube and placed in a place to dry before storage and usage.
- Step seven: Hand-wash the fabric Camelbak pack in cool water. Utilize a mild soap to remove dirt, aerate and disinfect. Immerse it in the sink for close to 30 minutes. Flush the pack with cold water and hang dry. Do not attempt to put your Camelbak water bladder in the washing machine, because it will void the guarantee and most likely destroy the pack.
- Step eight: Reassemble the already washed, dry Camelbak parts. Hang them on a hanger and keep in a cool, dry place, (for example, a lobby wardrobe) between uses.
Bleach, White Vinegar, and Baking Soda
This is an ideal way to clean a Camelbak hydrating bladder. Baking soda prevents of foul tastes and odors from the plastic section of the water bladder. Make use of hot water together with bleach or two tablespoons of clean baking soda. Do not empty boiling fluid into your Camelbak water bladder; it can bring about damage. You can likewise include 1.5 ounces of white vinegar substance, which will execute germs, mold, and mildew.
Set up these ingredient solutions and put it inside the water bladder. The baking soda will bubble. After the bubbling has settled, make the solution sit in the water bladder for five 5mins. Lift the water bladder up slightly, over your head, and squeeze the bite valve. Make sure that the bleach moisture is uninhibitedly going through the bladder tube to clean and sterilize it. It is highly recommended to give the cleaning solution a chance to settle in the bladder for no less than 30mins before pouring out the bladder.

Clean the Camelbak hydration bladder with slightly warm or hot water and a mild cleanser. Always thoroughly wash off any cleaning cleanser or bleach content. If you have Camelbak brushes close by, utilize them to wash your tube and bladder. Brushes guarantee broad scrubbing of all the sections of the bladder bringing about a perfectly clean water bearer.
Air-drying your bladder subsequent to washing diminishes the chances of dampness getting caught inside, which give mold the chance to grow. If after intensely cleaning the Camelbak water bladder, and there are still some mold spots in them, then the Camelbak is permanently defiled, yet should be still safe to utilize.
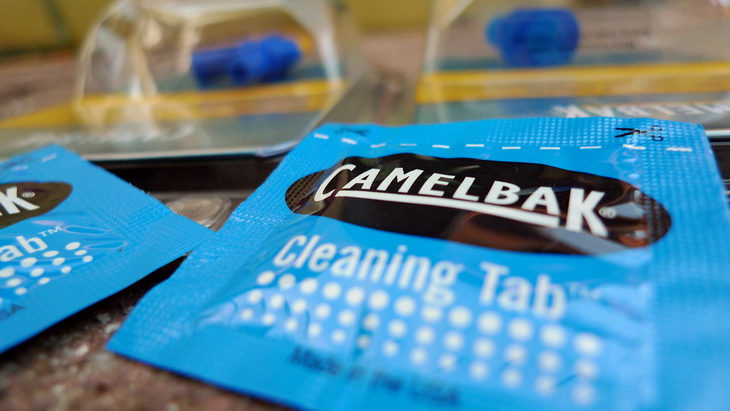
Most of us are already satisfied with utilizing bleach to clean the water bladder, however, there are some other alternatives out there. Camelbak produces tablets that dissolve in water, like denture cleaning tablets. Most people utilize the baking soda, too. In the next section, we are going to take you through to the efficacy of hydraulics cleaning tablets.
Hydraulics Cleaning Tablets
This is another ideal option for cleaning a Camelbak water bladder. Fill the bladder with moderately hot or warm water; do not use too hot water. Put one cleaning tablet into the bladder and cover the top. Leave the water bladder lying on its backside for close to 5mins. Shake the water bladder for 40secs for mixing and spreading the cleaning solution. Slightly squeeze the nibble valve and softly press the bladder to evacuate any gathered air. From that point forward, fill the bladder bite valve and hose with the cleaning solution. After 15mins, empty the cleaning concoction, and wash the bladder with spotless water. You need to be mindful when utilizing iodine or other disinfectant tablets since their longtime usage could add stain to the bladder.
Fill the Camelbak water bladder with warm or somewhat heated water and a gentle washing cleanser; do not make use of boiling water or bleach. Take off the hose away from the water bladder and the nibble valve away from the hose. Utilize a little bladder washing brush to clean the inward area of the hose. Take off the silicone valve cover and the nibble valve. Clean them gently with a mild cleanser. Keep the bite valve and hose in ventilated region to dry; don’t place them in direct sun. Embed the drying rack through the top and into the water bladder and allow it to dry in a very much ventilated region.
Tips and Warnings
- Try to use hydration cleaning tablets to help eliminate water bladder microbes. Camelbak water bladder and tube cleaning kits are accessible for procurement. Simply utilize water present in your Camelbak bladder, since sugary drinks enhance the growth of bacteria and therefore makes cleaning a Camelbak a more complex task.
- Be cautious when utilizing strong cleaning solutions, like bleach, on Camelbak parts, as strong solutions can cause damage to the plastic coating. Never utilize more than two tablespoons of bleach. Fully flush and wash all hydration areas after each usage in order to guarantee user security and enhance healthy outdoor activities. The components that uncover staining may need to be replaced.
Storing Your Hydration Bladder
The greatest threat associated with a clean CamelBak water bladder is the storage. You can keep a water bladder in a refrigerator, yet after some time, the steady thawing and freezing can harm the tubes and O-rings. What you need to do is to Bend a vinyl-secured metal garment hanger so that the two wings are in the same line with one another. String them directly into the bladder opening and the wings will support the bladder sides separately for drying. On the other hand, clip off the top of the wire in one arm side of the hanger and string the long flat piece directly into the water bladder. Hang it in a warm, dry spot.
After every utilization of the hydration framework, the pack is a no-brainer and we can either hang the bladder to dry or give it a plunge and a fast wash to clean. When dry, it can be easily kept. However, the issue begins with the bladder. While washing it isn’t an issue, drying and storing it will definitely be a potential wellbeing risk if not done in the right way.
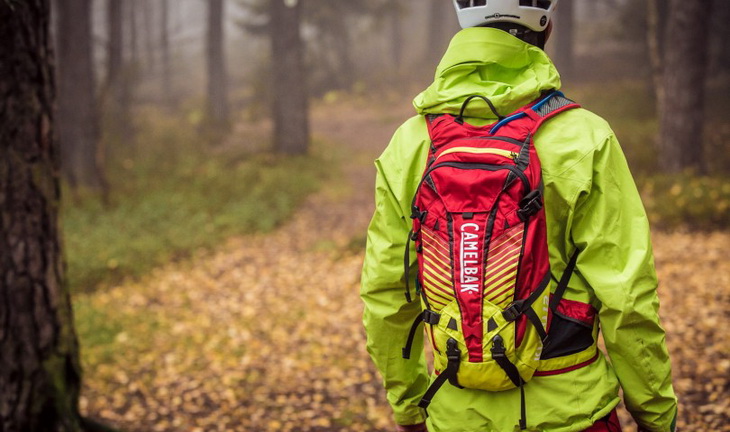
If you enjoy cycling, mountain biking, hiking or any other outdoors, it is ideal to get a good hydration pack. Conveying your water in a Camelbak bladder kept in your pack keeps you hydrated and your hand free.
The issue when it comes to using hydration bladders, however, is keeping it clean at any point in time. Attempt as you may, you won’t have the capacity to get most of the water out of the bladder when you return home. A breeding ground for microbes is stagnant water, and which will make water poured in your bladder taste crazy and with a possibility of becoming hazardous to drink.
Camelbak water bladders are not cheap, so you would prefer not to supplant them the moment they begin to smell bad. Things being what they are, how would you protect your water bladder and make it safe and clean? Here is a straightforward tip, to stay away from awful smells and more terrible microbes.
Store your Camelbak hydration bladder in the refrigerator. The bladders are not that large when emptied, so you will undoubtedly be able to get some space in your freezer for one. Simply go ahead and place the hose in there, as well. Any water bladder part that may have water residue in it, are required to be put in a chilled storage. The frosty temperatures will eliminate any bacteria and keep eruption of bad smell. Whenever you are in need of your hydration pack, just remove the bladder from the refrigerator, top it off, as you usually do and enjoy how frosty your water stays due to the bladder’s temperature. Your water will definitely have a great taste and pure smell, however, only if you are filling your bladder with clean water.
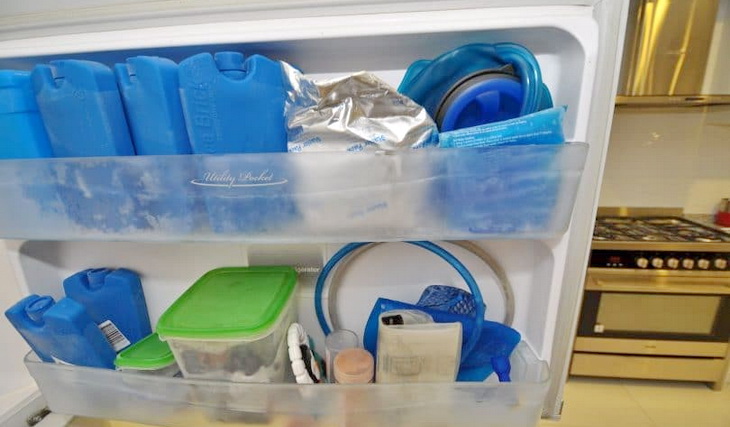
Of course, you can spend the cash on a cleaning gear, however, even those are not ideal for eliminating bacteria and do not guarantee that you get the majority of the water from the bladder once you are done. Also, they cost a lot of cash. You already possess a refrigerator. Storing your hydration bladder inside it is free, simple and an approach to keep it new and fresh.
Wrapping it up
If you want to drink safe and clean water while hiking, biking or hiking, always take the time to clean your Camelbak water bladder by making use of white vinegar and baking soda until it is completely clear and clean.
If you want to employ an ideal approach to clean a Camelbak water bladder with a narrow opening and a longer body, utilize a vinegar and breaking soda solution. A vinegar and baking soda solution blend disinfect and leave the Camelbak water bladder free of mold and bacteria.
In case you are searching for chlorine-free and biodegradable cleaning tablets, make use of Hydraulics Cleaning Tablets. They stand out among the best in keeping up Camelbak water bladder hygiene. These are natural tablets and will keep your water bladder fresh-looking and bacteria-free. Camelbak water bladders are available independently of the entire Camelbak rucksack system, and even with cleaning the bladder frequently, there is also nothing bad, in possessing more than one and exchanging them between the use.
ESSENTIAL SKILLS
Discover The Beautiful Trails In The Phoenix: A Guide To Must See Places In Arizona!

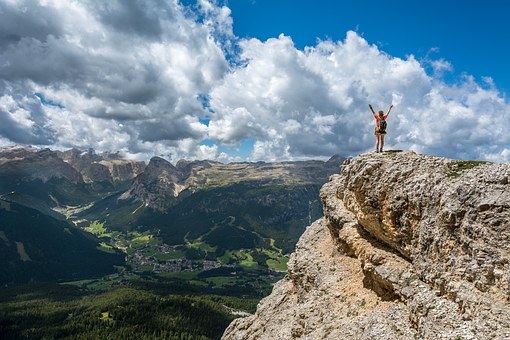
Ranked by the National Geographic as an ideal hiking destination in America, Phoenix is often seen as the safe haven for hikers. This iconic city of Phoenix has three incredible mountain preserves with many amazing trails leading to more than 180 miles of notable and developed trails.
These trails are source of attraction for outdoor adventurers and some, casual walkers. South Mountain is made up of a whole of the southern border. Camelback Mountain remains solitary and covers the Central Valley horizon. Piestewa Peak stays a series of mountains located on the northern side of Phoenix.
Inside the Phoenix city herself, there are uncountable numbers of preserves, green belts, and parks that are easily accessible for great hikes and casual walks. Are you interested in knowing some of the best hikes in Phoenix? If yes, read on!
Best Hiking Destinations in Phoenix
Listed below are some of the 10 best hiking places you need to know in Phoenix, these are arranged in no particular order.
Piestewa Circumference – Freedom Trail
Average Time: 2 hours
Level of Difficulty: Moderate
Distance: 3.8 miles round trip
While Piestewa Peak is generally known for its ever-famous Summit Trail, the Piestewa Circumference Freedom Trail offers a more intensive look at and a closer involvement with the landscape of the desert. Wound around the bottom of the peak, this region holds a variety of desert flora you can ever find in the mountain preserve.
Some portion of this trail synchronizes with the Nature Trail, which offers educational plaques itemizing different flora. The trail starts at the north end of the trail park and will promptly take you over a dry, rocky spring bed, before joining with the Freedom Trail Loop. Since, this is a circumferential hike, you can take either direction.

However, you should consider whether to choose a steep climb before you start a hike or go for a right at the intersection. Within Four miles in the preserve, there is some mellow rise picks up all through the hike that are ordinarily close to few memorial saddles.
These are decent chances to stop and take a proper look at the landscape: the peaks, the Phoenix horizon, and many other exciting desert landscapes.
Picketpost Mountain
Average Time: 3 to 4 hours
Level of Difficulty: Difficult
Distance: 4.3 miles round trip
With just 2,000 feet of rising, hiking in the Picketpost Mountain is one that will make you return for more. It provides you a brief trip on the Phoenix Trail before climbing a series of bent curves such that in a matter of one mile, it will make you look down toward the Valley ground floor from 2,800 feet away.
At this point, the trail gets somewhat specialized as we bend, leaning on the cliff walls and intersecting shaky edges before entering a very narrow valley. This area will test your strength and should be done with caution. Just stay focused and engaged.

From the valley, the trail starts an upward series of bent curves and some fun stone bouncing to the upper plateau and lastly the summit. Make sure to stop a while and observe your surroundings as you climb. You will find the views amazing as you ascend.
When you reach 4,375 feet, you will find the panorama incredible, starting from the Superstition Mountains to the Four Peaks to the Weaver’s Needle. During the day, you will have an extraordinary perspective of the Catalina Mountains which is located in the north of Tucson. To your surprise, there is a mailbox on top of the mountain? The Picketpost Mountain is one of a kind trail to enroll in without a doubt.
Tom’s Thumb
Average Time: 3 hours
Level of Difficulty: Moderate
Distance: 4 miles round trip
Situated in the more isolated northern region of the McDowell Sonoran Preserve, you will find Tom’s Thumb sitting at 140 feet and can be seen all through the East Valley and Scottsdale. Numerous hikers often call this local landmark “the dork” due to the amazing patriarch of the climbing scene.
Nevertheless, you do not have to be a climber to appreciate the sheer views of this bulging hiking scene. After climbing for a half-mile, you will reach a precarious series of bend curves. The perspectives are stunning and will help in keeping your mind off the work you are putting in.

You can also anticipate for more stunning perspectives of Cave Creek Mountains, Four Peaks, and Bartlett Lake. At about one mile, you will be sitting at an amazing 3,680 feet. About a half-mile later making two miles, you will gain a saddle for another extraordinary perspective.
At that point, there remain just a half-mile to the ridgeline and an appropriate perspective of Tom’s Thumb and its remarkable proportion.
Camelback Mountain’s Echo Canyon Trail
Average Time: 2 hours
Level of Difficulty: Difficult
Distance: 2.3 miles round trip
Camelback Mountain should be a once in a lifetime hiking. Regardless of whether you are simply going to the Valley or living around here, Camelback Mountain hikes offer probably the most encompassing perspectives of Phoenix.
Situated in the heart of the city, this 1,264-foot climb is an extraordinary taste of the mountain tucked inside the suburban boundary, one that is certain to blow your mind in more courses than one. Throughout this hike, you will enjoy the areas of stair stepping and scrambling.

If you are a little bit nervous to climb, be rest assured that handrails have been set up for your help if necessary. At simply under a mile, you will see a false summit. While this may appear like a dreadful trick after the cardio you have been using, the main summit is some steps away from this, and you will soon be on the most remarkable top you can ever find in Phoenix.
Feel relaxed, catch your breath, and appreciate the sights of the amazing metro Phoenix right from South Mountain to Chase Field, Superstition Mountains, and Four Peaks. This is a completely remarkable way to see the beauty of the whole city.
Hieroglyphic Trail
Average Time: 1.5 hours
Level of Difficulty: Easy
Distance: 3 miles
This short climb offers awesome perspectives of the Grand Superstition Wilderness Area and in addition an ancient accumulation of Hohokam petroglyphs. Situated at the bottom of the Superstition Mountains, hiking on the hieroglyphic trail is ideal for families and even a beginner hiker.
The trail head shared something in common with the Lost Goldmine Trail, yet advance you up a little hill and you will discover two wooden sign post stamping where the trail divides. Move left and proceed towards the mountain. At about a half-mile of hiking, you will eventually see the Sombrero Butte, Camelback Mountain, and South Mountain.

Proceed with another half-mile, and you will be entering the Hieroglyphic Canyon; move along this trail and at about five to nine minutes, you will get into an extensive rocky zone with scores of Hohokam petroglyphs and few small-scale pools of water. You might be wondering why this preserve was not given the name Petroglyphs Trail.
It appears that the early pilgrims and mine workers are to be blamed for the misconception. The Hohokams occupied the Central Arizona, roughly 800 years back, leaving a lot of petroglyphs behind that the early pioneers mixed up as Egyptian hieroglyphics. Hence, give rise to your Hieroglyphic Trail.
Mormon Trail to Hidden Valley Trail
Average Time: 2.5 hours
Level Of Difficulty: Moderate
Distance: 3.9 miles
Situated inside the biggest municipal park in the city of Phoenix, the Hidden Valley Trail of South Mountain gives you a chance to get away from the city with uncommon rock developments and two natural rock channel marking the end of this half-mile trail.
Quietness is always a common thing during this hike, as the city and its sounds look like they have vanished, abandoning you with dazzling rock formation and dry sandy washes. Now entering the Mormon Trailhead hike, the rising is prompt, because it is like half-a-mile to the saddle, where there is a fantastic perspective of downtown Phoenix.

You will then hit a steep area of the trail from here, which will straighten out around the one-mile checkpoint. In a matter of minutes, you will come across the crossing point with Mormon Loop and you will need to go straight, remaining on the Mormon Trail throughout until the point that you run into the National Trail.
At this point, take a right and you will be going towards Fat Man’s Pass leading to the Hidden Valley Trail. You are going to enjoy the view and exit through the other rock channel to go back through Mormon Trail.
Cave Creek Trail to Skunk Tank Loop
Average Time: 6 hours
Level of Difficulty: Moderate
Distance: 10 miles
Situated in the upper east of Phoenix within the Tonto National Forest, this particular trail features the riparian desert spring that is Cave Creek. This is more than a city; a real creek flowing through some region of Tonto National Forest, supporting a broad cluster of fauna and flora and not typically found in the desert.

After entering this hike, you will probably overlook that you are right in the desert and some miles away from the city, all regards to the lavish vegetation and the sound coming from the streaming creek adjacent to you. This loop gives you an awesome day hiking adventure.
It starts with a quiet trek through shallow and short water intersections and underneath lavish shades of trees, before finally dropping into a limited canyon and sending you climbing along a lovely, rocky creek bed. At that point, the Skunk Tank Trail loop includes some cardio, with wonderful all-encompassing perspectives on moving hills and mountains that appear round.
It is not an awful result, and simply going over part of the way through the trail, the long bend curves have hoisted you to 3,665 feet. After just a mile, the trail makes a curve and meet up with the Quien Sabe Trail 250. This is the most elevated purpose of the hike at 4,075 feet.

Proceed a little more, you will soon reach the Quien Sabe mine, and after, the old mine worker’s camp. This is a decent place to stop by and appreciate a little history before finishing the two miles remaining.
Boyce Thompson Arboretum
Average Time: 2.5 hours
Level Of Difficulty: Easy
Distance: 3 miles
Situated at the floor level of Picketpost Mountain just close to Queen Creek, Boyce Thompson Arboretum is a headquarter for most of the desert plants throughout the world. This Arboretum hike is more than just a hike.
It is more or less an educational walk and an awesome chance to start perceiving what vegetation you have seen on the trails. For a starting hiker, what you will be amazed by what normally occurs in the Valley area you are trekking through.
Upon landing, you should desire to go through the Main Trail as it interfaces with the arboretum’s remarkable elements and appealing routes. For an absolute taste of what you may experience on hikes close to Phoenix, ensure you hit up the Sonoran Desert Trail before going back to the Main Trail.

From that point, you will discover why you need to visit the Smith Interpretive Center and the Hummingbird Gardens, a memorable structure repurposed to hold two nurseries, displaying succulents and desert flora from around the globe. As you continue going on, you will soon arrive at Ayers Lake, a fabricated reservoir giving water to the whole grounds and serving as a flying creature asylum.
Past this, you will be hiking through a riparian territory, Eucalyptus Forest, an intuitive herb cultivations and a brush of palms. Your trip will be ended with a stroll over the Outback Bridge, finishing on the walkabout trail located along the Australian Desert Exhibit.
Peralta Trail to Freemont Saddle
Average Time: 3-4 hours
Level of Difficulty: Moderate
Distance: 4.9 miles
There is a considerable measure of mystery and history related to the Superstition Wilderness Area, bringing the early historians and hikers to the old mining grounds. Regardless of whether you believe the story or not, this trail is an extraordinary insight into the majesty and beauty of this amazing region.

More so, it leads to one of the best perspectives of its popular landmark: the 1,220-feet-tall Weaver’s Needle. Peralta Trail is named after a family from Sonora, Mexico, who mined the in this same region before an extraordinary slaughter, resulting in different stories of hauntings, lost maps, and gold.
It begins with a heading left to the trail head. At this point, you are going to appreciate the beauty of the gliding mountains that surround you before intersecting the Peralta Creek at the quarter-mile checkpoint, where you start your rising.
After a mile, you will reach a fork in the trail; keep going right and proceed through a series of bend curves upwards. At about a mile and a half, you will come across the Geronimo’s Cave while looking over the canyon. The trail will cross the desert spring bed again before directing you upward and onto some brilliant colored volcanic region.

Thereafter, you will pass a cave entrance. At that point, it will be left with one-half mile Freemont Saddle for a stunning perspective of Weaver’s Needle.
Reavis Falls
Average Time: 9 hours
Level of Difficulty: Difficult
Distance: 14 miles
Did you realize that there is a 140-foot waterfall just some minutes away from the city of Phoenix? Yes, the Reavis Falls is just 30 feet taller than the famous Niagara Falls. Located deep in the Superstition Wilderness, this fall is not for the swoon of heart, but rather it is unquestionably justified regardless of the effort.

The condition of the waterfall fluctuates based on any last rainfall occurrence, so arrange in like manner. Start at Reavis Trailhead, with a wonderful perspective of Apache Lake, which is right behind you and an extraordinary visual upon your arrival.
From here, you will make a curve and move through Reavis Trail for a little more than two miles, gaining a saddle at around 4,000 feet. A snappy swing to look behind you yields an extraordinary perspective of Four Peaks. After a mile, you will start to see Castle Dome.
This is a precarious aspect of the trek arrival at a saddle at around 4,675 feet. In a matter of one mile, the trail starts to slip. The descent is around 1,625 feet. And, recall that this will be a jump while going out. At about six miles, you will get to Reavis Creek and trace it upstream, where you will traverse the creek a few times.

This includes much rock jumping and customarily extremely icy water. In case the stream is great, you will hear the gliding sound of the waterfall before you see it. The sounds will allure you nearer until you get to this mind-blowing sight, smack spot at the very center of the desert.
Tips for Hiking in Phoenix
Over 200 hikers are being delivered every year from the preserves, mountain stops and desert of the city of Phoenix. The essential tips below can help prevent you from adding to the number:
Tip 1: Watch the Weather
Yes. “It’s a dry warmth”. However, Phoenix’s temperature can be misleading and fatal. Climb when it is cool outside. Attempt early mornings and nights when there exist more shade.
Tip 2: Dress Appropriately
Wear appropriate sunscreen, cap or hat, clothing, and shoes
Tip 3: Bring Water
Ensure you Hydrate before you leave for the hiking trip. Winter climate in Phoenix may fluctuate around a high of 67°, yet make sure to pack water along, regardless of what the temperature might be. Have a lot of water, more than you might predict you require.

However, if you are outside in the Phoenix sun, you will require significantly, at least 8 cups of water for the day. In case you are heading outside for any reason at all, carry along a bottle of water. If the purpose of going out is hiking, carry along many bottles of water or preferably, a drinking system.
Many individuals have encountered their death after heading into the preserves inside a temperature of 110-degree heat without enough water. That is the main reason hikers are often warned to stay inside or create a shelter beside one of the pools available in the Valley until the month of October.
In case you need to go outside, you may be enticed to hold up until night when it is cooler. It is an intelligent arrangement, but you should know.
Tip 4: Keep in Contact
Convey a cell phone or a satellite phone along anywhere you go and let your friends and family know your plans and the locations you plan on visiting.

Tip 5: Team Up
Don’t ever go hiking alone. In case you feel like going alone, tell somebody about your area of interest, begin times and end times.
Tip 6: Be Honest
Do you have any medical condition? Back issues, knee, diabetes, heart issues, Asthma? Try not to encourage yourself.
Tip 7: Don’t Trail-blaze
You are free to enjoy the beauty of the Sonoran desert landscape. But please, remain on assigned trails.
Tip 8: Take Responsibility
Try not to be somebody that won’t get ready, shouldn’t have been there for wellbeing reasons or overlooked security rules. Be the mindful climber, who gets out for hiking and does it right.
Tip 9: Know the indications of heat stroke
As indicated by the Health Services Department of Arizona, the way to an existence debilitating heat stroke takes after genuinely predictable steps, with a few cautioning signs, for example, warm stroke, warm fatigue, Heat spasms, Thirsty, et cetera.

Most heat strokes can be prevented by staying inside, wearing lightweight clothing in light hues, taking even and consistent breaks, and, more importantly, drinking a great deal of water.
Tip 10: Avoid the honey bees
Based on the information provided by the Health Services Department of Arizona, you won’t see a ton of animal creatures or bugs all over the place. Most turned out around evening time, so watch the path you step on when you are doing the night walk.
Phoenix honeybee season and summer go as one. Each mid-year, honeybees attack no less than a couple of individuals and dogs present around the Valley.
Tip 11: Always take your sunglasses along
With shorter storms found in Phoenix, the sun frequently set and changes roadways into mirrors, reflecting a very bright light in your eyes and making it difficult for you to see the path lines.

Keep your sunglasses close to you all the time and drive with caution.
ESSENTIAL SKILLS
Camp Safely With These Essential But Simple Camping Safety Guides: The Do’s And Don’ts About Camping!

There is nothing like escaping into the great outdoors for a fun, relaxing trip away from the bustle of daily life. However, enjoying yourself may come at a cost if illnesses or injuries become part of your adventure.
That’s why it is important to consider the following camping safety tips, not just for your time at the campground, but to properly prepare and pack for your trip before you even leave the house. Doing so can ensure a safe and healthy trip, so you can spend your time enjoying yourself rather than tending to wounds or rushing to the emergency room.
Preparing for Your Trip
Whether packing for a two-week vacation or just a weekend at your favorite camping spot, you have to prepare and pack correctly, to be prepared for any occurrence.
Get Vaccinated: Illnesses such as meningitis or whooping cough may not seem like an issue when camping, but you never know what diseases other people you meet during your trip may be carrying.

That’s why it is important for your first step to be up to date on your vaccinations, so you don’t bring any unexpected, and potentially fatal, souvenirs home with you. This goes for all members of your party, including spouses and children, and even your pets.
Packing for the Weather: When packing clothing, be sure to check out the weather report for the area you’ll be camping in so you can pack clothing appropriately. But don’t just pack according to the report, because weather can change at any time.
If the report calls for sunny days and clear nights, pack some pants and sweaters along with your t-shirts and shorts in case it cools off, or unexpected rain showers move into the area.
This goes for bedding as well. Having a few extra blankets won’t take up that much room, but it’s better to have them and not use them than to freeze during an unexpectedly cool night.
Fans and heaters are also a good option if you have the room and access to electricity; just be careful where you place them, and be sure there is enough ventilation to reduce any risk of carbon monoxide poisoning.
Packing Food and Water: Water is a necessity, especially in high temperatures where you’ll be sweating excessively and need constant hydration. Many areas do not have clean drinking water, so be sure to pack enough for all members of your party during the entire trip, and check to see if there is a store nearby to purchase more, just in case you begin to run low.

When packing food, be sure any meat is packed carefully so it will not come in contact with any other food items. Contamination could mean discarding an entire cooler of food, leaving you with nothing. Using sealable containers is the best choice, so there will not be any chance of meat juices leaking into other items. Also, if there is cooked meat and raw meat, keep them separate as well, to reduce the risk of food-related illnesses.
Prepare a Safety Kit: Should injuries happen on your trip, you don’t want to be left unprepared. That’s why a safety kit should be prepared in full before you leave. The kit itself should be a sturdy, waterproof container, and include:
- Bandages-rolled, plastic, triangular, butterfly, large and small
- Sterile compresses
- Adhesive tape
- Splints
- Gauze pads
- Antiseptic sprays or wipes
- Cotton swabs
- Scissors
- Tweezers and nail clippers
- Safety pins
- Thermometer
- Creams – Antibiotic, burn, poison ivy
- Sunscreen and after sun lotions
- Peroxide
- Hot/cold packs
- Bug spray
- Razor blades
- Pain and sinus medications
- Antacids
- Eye drops
- Snake bite kit (if poisonous snakes are in the area)
- Ipecac (to induce vomiting if poisonous or harmful items are ingested)
- Latex Gloves (and a non-latex type, in case of a latex allergy)
- Road flares
- Any personal medications normally taken, prescription or otherwise
Not only should you carry these items, but you should know how to use them all. It is also a good idea to take courses in both CPR and First Aid, so you can be prepared for any type of injury or situation.

Check your safety kit often, as some of the items in this list do have expiry dates, and may need to be replaced before your camping trip begins. And be sure to replace anything used, so your kit is always fully stocked.
Inform Others of Your Plans: Before you leave, make sure others are aware of your destination, and how long you’ll be gone. This could be a family member or a friend, whichever you prefer.
This way, if something happens and you are left stranded in the woods with no cell service, someone will be expecting you home and will be concerned if you don’t show up. Do not post your plans on social media, though. Telling the world you’ll be away for even a few days could invite break-ins and theft, so keep your plans off of Facebook and Twitter.
After Your Reach Your Destination
Whether camping in the wild or at a busy public park, be sure to follow these tips to ensure your trip will be filled with laughter and fun, rather than pain and injury.
Setting up Your Site: When setting up your tent, be sure to do so away from the fire pit area so there will be little chance of sparks landing on the material and starting a fire. Campers are less at risk, but if a canopy is opened, it could also catch on fire, so plan your site accordingly.

Food Storage: For those using a cooler, hopefully you’ve followed the advice on packing your food items listed above. If so, there is only the risk of spoilage to worry about, so be sure to keep your food cold by replacing the ice that has melted each day, especially if in hotter temperatures.
An insulated cooler is the best choice, because it will hold its temperature longer, as long as it is not opened unnecessarily throughout the day. There are even plug-in coolers available, but if you’re not at an electrical site, these will be of no use.
After cooking meals, be sure to pack up all extra food properly and safely, and store it in the cooler. Do not leave food laying around your site, because this could attract unwanted animals, from small, harmless ones like squirrels to large, dangerous bears.
Also, do not keep food in your tent, for the same reason. If possible, store your cooler and other non-refrigerated items in the trunk of your car, to reduce the likelihood of unwanted animal attention.

Sun Protection: Be sure to use sunscreen at all times when camping, even if it is overcast. Harmful UV rays can still reach you through the clouds and cause burns you may not realize you are getting. If you are swimming, apply it about half an hour before entering the water, and reapply it often. Sunglasses and hats are also a good idea to protect your eyes on bright days.
Critter Protection: Bugs can carry diseases, and a single bite could bring with it an unwanted illness along with itchy discomfort. That’s why you should protect yourself from mosquitos, ticks, and other unwelcome pests by using bug spray throughout your trip.
Larger critters can also be harmful, though there is no spray for small animals. If snakes, squirrels or birds are nearby, do not try to touch them or interact with them. For smaller mammals and birds, you could carefully shoo them away from a distance.

Snakes or other potentially poisonous animals should be avoided, and if you find you are too close to one, back away slowly, and leave them be. They probably won’t stick around if there are people nearby.
Having fun: Camping trips include all kinds of outdoor activities, including hiking, bicycling, swimming, and many others. If these activities are going to be part of your trip, be sure to prepare for them by bringing the appropriate gear.
This includes helmets and padding for knees and elbows when biking, proper footwear for hiking and walking, life jackets when boating, and swim rings and water wings for swimming.
Be sure all of the members of your party can handle the terrain for the hiking and biking trips, and don’t force anyone to go farther than they can handle. Keep in mind that little children will tire out, and the further you are from your site when they stop walking, the longer you will be required to carry them.
When swimming, don’t go alone, and supervise any inexperienced swimmers closely. Bring snacks and lots of water for these adventures, but don’t eat right before swimming to reduce the risk of cramps.
For some quiet time, bring a few toys and coloring books to keep the kids occupied in the site, especially if you have littler ones who need naps. Blowing bubbles is also a great way to entertain kids for hours.
Getting Lost: No matter what activity they are engaged in, be sure to watch your children closely when camping, and explain to them the risks of getting lost if they wander away into the woods, so they are aware of the dangers of wandering off alone. Of course, not only children can get lost.

Many adults head out for a hike and can’t find their way home. That’s why it is important to always tell someone in your party where you are heading, in case you don’t return. Carry a map if possible, as well as a GPS locater and a compass. Even having a whistle can help you to get rescued, and it is small enough that it is easy to carry in a pocket or on a rope around your neck.
Staying Cool: No matter what you’re doing, it is important to stay cool and hydrated, especially on hot days. Drink lots of water to replenish what you are losing, and reduce the risk of heat stroke.
If playing games, with grown-ups or children, try to do so in a shady area, and be sure to sit down and rest if you feel yourself overheating. Don’t go for long hikes or bike rides if the temperature is especially high.
Cooking Safety: Some rules for cooking when camping are the same as those at home. Be sure to prepare food on a clean surface. Wash your hands thoroughly before and after handling any food items.

Cook meat to a safe temperature before eating, and carry a meat thermometer to be sure this is done correctly. Don’t mix raw foods with cooked foods, especially meat, so there is no contamination that could lead to food poisoning or other food-related illnesses. After eating, store any leftovers away promptly.
If cooking over the fire, be sure to use sturdy metal utensils with safety handles, and wear a fire-retardant cooking mitt or glove to keep from getting burned. Don’t cook over high flames. Have somebody keep any children and pets away from the fire when you’re cooking, because you may be too focused on what you are doing to watch them at the same time.
If using a stove or grill, be sure to store the fuel canisters properly in an upright position. Don’t place them too near a fire pit, and don’t try to change any canisters near an open flame or if the stove is already hot.
Make sure you are in a well-ventilated area when using these items, and never try to use one in a camper or tent, because of the threat of carbon monoxide, as well as a risk of fire. When not in use, turn it off and remove the fuel container, so there will be no chance of injury or explosion.
Fire Safety: At the end of the day, there is nothing more relaxing than sitting around a fire, chatting with your family and friends, or just enjoying the quiet. But in order to fully relax, you need to be sure your fire will stay where it belongs.

If there is no proper fire pit provided, and you must make your own, be sure to do so in an open area, away from any tents, trees or other flammable items. Place a ring of large stones to enclose your fire.
Keep a bucket of water, sand, or a fire extinguisher nearby just in case it gets out of control. Do not leave it unattended for any reason, and be sure to extinguish it completely before leaving your site or heading off to bed. Also, be aware that in dry seasons, there is a higher risk of forest fires, so check for any bans in the area before even lighting the match.

Winter is coming sooner rather than later, and for those of us that love the outdoors it means one of the best times of the year. Winter Camping. Going on a winter camping trip can give you some of the best views, the most serene landscapes, the best fishing, and some of the least crowded trails and camping grounds of the year. While winter camping can be one of the greatest joys in life, there are certain pit falls that come with going on a winter camping trip.
Depending on which area of the world you are in there are many different things you must consider before you begin your camping adventure. Between choosing the proper equipment, preparing for the potential winter storms, and making sure that you have all the information possible, preparing for a winter camping trip can be overwhelming. The good news is that we will go over some various cold weather camping tips that will help keep you and your group safe and happy on your trip.
Before The Trip
Before you even starting purchasing the equipment you will need to keep yourself safe on your trip, you must evaluate where you are going, what you will be doing, and a myriad of other safety precautions.

It is imperative that before you start your journey you have a definitive plan in place.
- While the serenity of camping during winter can be truly breathtaking, it is important that you do not go out on your own. Winter can be the most dangerous month of the year for camping, and without a partner or group to go with you, you can find yourself in a very bad situation with little to no help very quickly.
- Plan when you are going carefully. Check what the weather will be like during different parts of winter for whatever location you have chosen. The last thing you want is to get to your destination and be stuck in the middle of a terrible storm. The NWS has detailed weather reports you can use to determine what you should expect.
- Check for potential avalanche areas. If you plan on going on a ski expedition you will need to make sure that you are aware of any potential avalanche areas at your destination. If you find yourself going to a location with a high avalanche potential, you and your group should get formal avalanche safety training.
- Make a detailed plan. Make sure that everyone in the group is on the same page with an extremely detailed excursion plan. You should know where you will be making camp, where your destinations are, and the nearest emergency services are to where you will be. More important make sure that someone who is not in the group knows exactly where you will be going and how long you will be gone for.
- Make a checklist and check it twice. Create a list of all the equipment you will be needing to bring with you. Make sure to add extra food and dry clothing just in case you get lost or weather turns for the worse. Also bring some cash for any unexpected emergencies that may occur.
- Do some research on the area you are going. Reading up on people who have been where you are going can give you valuable insight on what you should expect from your trip.
Clothing and Gear
There is nothing more important when you are camping in the cold than the proper clothing. The biggest rule of winter is camping is to stay warm and dry at all times. Clothing should be able to wick away any moisture and rain, dry quickly, and be both warm and breathable. The general rule of thumb is to have three layers at all times when you are camping during winter.
The Base Layer
You base layer is basically just your under garments. Since this is the closest layer to your skin, you want to make sure that the clothing you chose for this layer is going to be able to wick away perspiration from your skin to the outer layers. For this layer you want to avoid cotton and aim for synthetic and merino wool clothing.

These materials dry extremely quickly, which will help you spend little to no time in wet clothing. Depending on the climate, it is common for winter campers to wear two base layers for optimal heating.
The Middle Layer
This layer is primarily used for retaining body heat, and overall warmth. Consider purchasing microfleece for this layer, as that material will provide the highest amount of heat retention. Whatever you go with, you want to make sure that this layer is providing the best heat.
The Outer Layer
The outer layer is also known as the “shell”. This layer is meant to be waterproof, windproof, and ideally breathable. Either Laminates or polyurethane-coated fabrics will work best for this layer, however laminates are considered the superior option. A lot of people do not consider this, but try to keep your outer layer fireproof as well, the last thing you want is a stray ember catching on your shell. This layer will be protecting you the most from the elements themselves, so do not skimp on the outer layer!
While your layers of clothing are important, you need to also make sure that you have the proper accessories to finish out your winter clothing.
Boots
While camping typically requires nothing more than a good pair of hiking boots, for winter camping you want to make sure you have a pair of boots that are both waterproof and sufficiently insulated.

If you plan on going skiing or snowboarding during your camping trip, you want to make sure that whatever boots you purchase have the proper bindings for your board and skis.
Socks
Socks should be warn in two layers at all times, and make sure that you have extra socks on you at all times. No one wants to have wet feet while you are tromping through the snow.

Another good idea is to purchase high quality gaiters that can be used to keep the inside of your boots as dry as possible.
Hats
Consider purchasing a balaclava along with a good beanie to keep your head as warm as possible. Most of the heat in your body will be transferred through your head, so make sure that your head is properly covered.
Gloves
Gloves should have proper coverage and also allow for finger mobility. While you want to insure your hands are as warm as possible, you want to still have mobility in all your extremities.

Mittens can be used on top of whatever gloves you decide to wear, just attach some sort of Para chord or rope from the mittens to your clothing so you can remove them quickly without losing them.
Eyewear
If you are a glasses wearer, then it is a good idea to get the proper eyewear to protect yourself from the elements as well as making sure that you will be able to see at all times. A good idea is to bring a pair of high quality prescription goggles and also a second pair of glasses in case something happens! Make sure that any goggles you get also have tinting to help prevent snow blindness.

When it comes to something as important as your eyesight, do not take any chances. Even if you do not wear glasses, a good pair of goggles will help to protect from the harsh cold winds of winter camping.
Once you have your clothing and accessories sorted out you want to make sure that you have the proper equipment to get through your journey safely. The proper equipment can make the difference between an easy journey and a journey that is fraught with problems.
Tent
Finding the right tent can be troubling, but the right tent will make a massive difference to you when you call it a night at your campgrounds. Surprisingly the smaller the tent the better! When you have a smaller tent you can heat up the inside easier than if you had a larger tent. With a smaller tent your body heat can sometimes bump the temperature inside the tent 20-25°.
You want to make sure that your tent is rated for the temperatures you will be traveling in.

While a tri-season tent may be ok for some climates, a specialized winter tent may be ideal for the climate you will camping in. If you expect a large amount of snow, or extremely low temperatures, the proper tent will make all the difference.
Sleeping Bag & Ground Pad
Next to your tent your sleeping bag and ground pad will be the two most important pieces of gear in order to keep you warm through the night. When shopping for a sleeping bag, check the temperature ratings for each sleeping bag, and make sure that you use a bag that is rated at least 10° colder than the coldest temperatures you are expecting to encounter on your trip.
If you get too warm you can always remove clothing, but having a low rated sleeping bag will ensure that you are 100% warm at night.

The other part of your sleeping arrangement is a ground pad or sleeping pad. Two layers on the bottom are worth one on the top, so making sure that you have a proper sleeping pad can make a cold night a warm night with little effort. We highly recommend using two pads to make sure you get the best heat retention.
A foam pad and a self-inflating pad will give you the best coverage, and make sure that if the inflate pad gets punctured you will still have some ground protection.
Backpack
A good backpack can really help with your exhaustion level while you are hiking to your camping grounds, but if you have too small of a pack you will not be able to pack all the equipment you will need.

Depending on how long you plan on being out, you may want to consider getting a lightweight deluxe sized backpack to make sure that you can carry all of your gear. The more pockets and storage the better!
Lights, Camera, Batteries
Winter is known for having the longest and harshest nights of every season, so you want to make sure that you have the proper lighting to keep you safe for the long nights. Purchasing a good LED headlamp will give the illumination you need during the winter nights. Make sure that you have enough batteries for all of your lighting equipment and for whatever camera you chose to bring to capture your journey.
Communication
When you are traveling in the back countries of winter, you will often find yourself with little to no cell phone coverage. Make sure that your group has a way to communicate to each other and the outside world at all times. Satellite phones and high powered two way radios can be used to keep your group in contact with the world at all times.
Specialty Equipment
If you are planning on skiing, snowboarding, or fishing on your camping trip make sure that you bring all the appropriate winter gear that can get the job done well.

Also make sure that if you are going to be bringing specialty equipment that you have the necessary straps on whatever backpack you purchase to carry the equipment. You do not want to be hiking through the woods and have to hold onto a fishing pole the entire time.
Tips and Tricks
Bringing the best gear and clothing can only go so far, and you and your group will need to make sure that you have all the knowledge possible to make it through your journey safely. With a few tips and tricks, you can find yourself getting around in your winter wonderland with no problems what so ever.
Getting your Bearings
If you are going to a location that has the potential for high amounts of sleet or snow, you may find yourself in danger of having your trails covered up. If this happens you want to make sure that you have all the possible routes in the area mapped out. Because of this you want to be certain that every single member of your group has the most up to date map of the area.

If you are using a GPS device, you want to have multiple routes to and from your camp site preprogrammed in. Anyone who finds themselves camping in a very mountainous region may want to pick up an altimeter to help determine exactly where you are.
Avalanche Safety
Campers who find themselves going on a camping trip in the mountains will want to make sure that they have all the avalanche safety equipment and training.

- Avalanche Transceiver: If you plan on traveling in any form of avalanche country you absolutely must have one of these for each member of your group. Learn how to use them, and keep it on you at all times.
- Snow Shovel: Everyone should have a snow shovel in their pack. While they are essential if any sort of avalanche happens, they will also be essential in the daily routine while you are camping in winter.
- Personal Locator Beacon: Whenever camping in a high avalanche possibility location, you want to make sure that you have a PLB on you at all times. If you activate the locator, the device will send out a signal to alert rescue teams of your exact location.
Create A Winter Camping Checklist
Before you even step a foot outside, you and your group should sit down, have a meeting and put together a checklist for all the gear and necessities you will need to bring with you. Everyone should be on the same page at all times, and everyone should have a copy of the checklist with them before they start packing.

The last thing you want is to forget something that is important for your trip because the person who was supposed to bring it forgot.
Check Your Pack Twice
Once you have gone over your checklist, it is a good idea to lay all of your equipment out and go over it multiple times before you start packing. When you pack aim equally distribute the heavier objects with the smaller objects like blankets and clothes so they have a lower chance of shifting while you move around.
Winter camping can be one of the greatest adventures of your life, but without the proper preparation it can turn south on you quicker than you can imagine. If you follow the tips outlined in this article you will find yourself getting through the serene winter wonderland with no trouble what so ever. A final tip, whatever you do make sure to enjoy every moment you spend in the beautiful country!


Discover The Beautiful Trails In The Phoenix: A Guide To Must See Places In Arizona!
Ranked by the National Geographic as an ideal hiking destination in America, Phoenix is often seen as the safe haven...


Health Benefits Of Drinking Water: Be Positively Hydrated!
We all know that humans simply cannot live without water. It is essential to our livelihood and helps the body...


Camp Safely With These Essential But Simple Camping Safety Guides: The Do’s And Don’ts About Camping!
There is nothing like escaping into the great outdoors for a fun, relaxing trip away from the bustle of daily...


Winter Hiking Tips: You Don’t Have To Freeze Out There!
Winter is coming sooner rather than later, and for those of us that love the outdoors it means one of...
-
 HIKING BASICS9 years ago
Best Hikes in Arizona: Best Trails in the Grand Canyon State
-
 ESSENTIAL SKILLS9 years ago
How Long Until Poison Ivy Rash Appears: All Detectable Symptoms
-
 ESSENTIAL SKILLS9 years ago
Fire Building Techniques: Know How to Build a Fire in Minutes
-
 ESSENTIAL SKILLS9 years ago
Urine Filter: Converting Urine into Drinkable Water
-
 FOOD & COOKING9 years ago
Edible Snakes: How to Know Which Ones You Can Eat
-

 SLEEPING BAGS7 years ago
Western Mountaineering TerraLite Sleeping Bag: The Perfect Outdoor Sleeping Bag
-
 HIKING BASICS9 years ago
Best Hikes In Alaska: Great Ideas for the Frontiers
-
 ESSENTIALS9 years ago
Shewee Review: A Look into the Shewee Extreme Female Urination Device